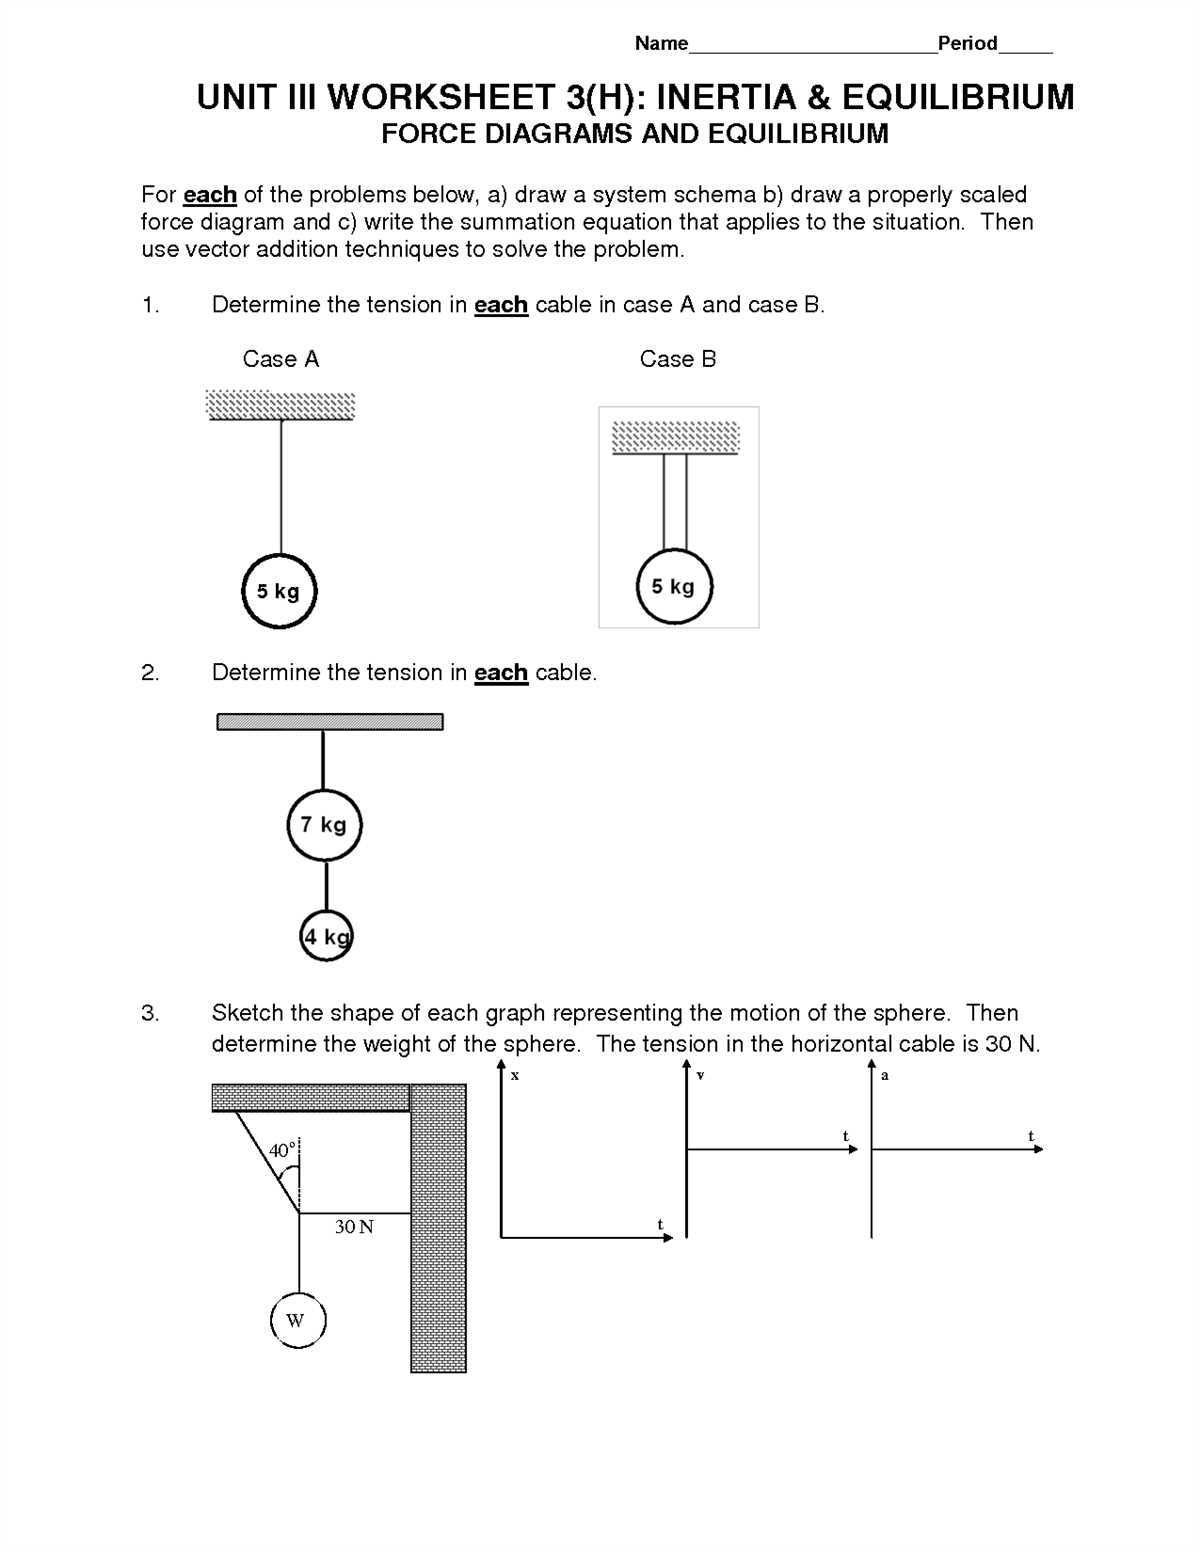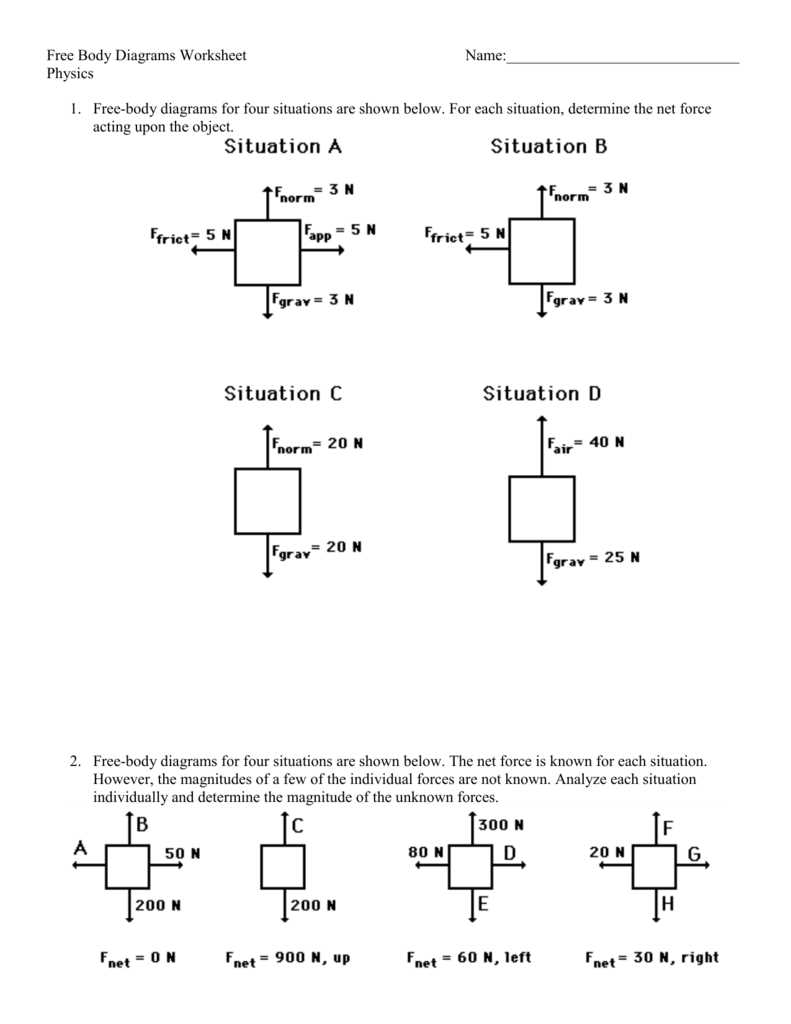
Free body diagrams are an important tool in physics that help us analyze the forces acting on objects. These diagrams show the forces as vectors, with the length of each vector representing the magnitude of the force and the direction of the vector indicating the direction of the force.
Using free body diagrams, we can visually represent the interactions between an object and its surroundings. By isolating the object and drawing all the external forces acting on it, we can determine the net force and ultimately understand the resulting motion of the object.
This free body diagrams worksheet answer key provides students with a guide to understanding and practicing the use of these diagrams. With the answer key, students can check their work and ensure they are correctly identifying the forces and properly representing them on the diagrams. This allows for better comprehension and application of the concepts.
By using this worksheet and answer key, students can develop their skills in analyzing forces, understanding Newton’s laws of motion, and applying these principles to solve problems. With practice, students can become proficient in using free body diagrams to solve complex physics problems and gain a deeper understanding of the fundamental principles of the subject.
What Is a Free Body Diagram?
A free body diagram is a visual representation of the forces acting on an object in a given situation. It is commonly used in physics and engineering to analyze the forces and their effects on the object. By isolating the object and depicting all the forces acting upon it, a free body diagram can provide valuable insights into the motion and equilibrium of the object.
The primary purpose of a free body diagram is to show the forces that are acting on an object. These forces can be either contact forces, such as friction or tension, or non-contact forces, such as gravity or electromagnetic forces. Each force is represented by a vector, which shows its magnitude and direction.
To create a free body diagram, one must first identify the object of interest and all the forces acting on it. This involves careful analysis of the given situation and understanding of the forces involved. Once the forces are identified, they are drawn as arrows on the diagram, with the length of the arrow representing the magnitude of the force and the direction indicating its direction.
A free body diagram can be helpful in a variety of situations, such as calculating the net force on an object, determining the direction of motion, or analyzing the equilibrium of an object. It allows for a systematic approach to analyzing forces and can provide a clearer understanding of the forces at play in a given situation. By using a free body diagram, one can effectively solve problems and make predictions about the behavior of objects under various conditions.
The Benefits of Using Free Body Diagrams
Free body diagrams are an essential tool in physics and engineering. They allow us to visually represent the forces acting on an object, providing a better understanding of the forces involved and their effects. By using free body diagrams, we can analyze and solve complex problems by breaking them down into simpler components.
Clarity and Organization: Free body diagrams provide a clear and organized representation of the forces acting on an object. By isolating the object of interest and drawing arrows to represent each force, we can easily identify and visualize the different forces involved, as well as their directions and magnitudes. This helps us to better understand the overall forces at play and how they may be influencing the motion or equilibrium of the object.
Problem-solving tool: Free body diagrams are a valuable tool in problem-solving. They allow us to systematically analyze a problem and determine the forces acting on an object. By clearly identifying the forces and their directions, we can apply Newton’s laws of motion to calculate the net force and acceleration of an object. Free body diagrams help us break down complex problems into manageable steps, making it easier to solve and find the desired solution.
Visualization and Communication: Free body diagrams provide a visual representation of the forces acting on an object, making it easier to communicate and discuss physics concepts with others. Whether it’s in a classroom setting or a professional environment, being able to draw and interpret free body diagrams enhances our ability to explain and understand the forces and their effects. It allows for clearer communication and collaboration when discussing complex physics problems or analyzing the behavior of structures and systems.
In conclusion, free body diagrams are an invaluable tool in physics and engineering. They provide clarity, organization, and visualization, making it easier to analyze and solve problems involving forces. By using free body diagrams, we can better understand the forces at play, improve problem-solving skills, and effectively communicate complex physics concepts.
How to Create a Free Body Diagram
Creating a free body diagram is an essential step in analyzing the forces acting on an object. It allows us to visualize and understand the effects of these forces on the object’s motion. Here are the necessary steps to create an accurate free body diagram:
- Identify the object: Clearly define the object or system of interest. This could be a single object or a group of interconnected objects.
- Select a reference frame: Choose a coordinate system or reference frame that best suits the problem. This helps in identifying the direction of each force.
- Identify the forces: Identify and label all the forces acting on the object. These can be contact forces, such as friction or normal force, or non-contact forces like gravity or tension.
- Draw the forces: Draw arrows to represent each force, starting from the object’s center of mass. The length and direction of the arrows should correspond to the magnitude and direction of the force.
- Label the forces: Label each force arrow with its corresponding symbol or name, ensuring clarity and accuracy.
- Indicate the direction of motion (if any): If the object is undergoing motion, indicate its direction using an arrow or other visual cues.
A free body diagram serves as a valuable tool for solving complex physics problems. By clearly illustrating the forces acting on an object, it helps in determining equilibrium conditions, acceleration, and identifying key interactions. Practice creating free body diagrams regularly to develop proficiency in analyzing and solving various physics problems.
Tips for Solving Free Body Diagrams

Free body diagrams (FBDs) are essential tools in solving physics problems involving forces. These diagrams represent all the forces acting on an object and help us analyze and understand the forces at play. Here are some tips to help you solve free body diagrams effectively:
1. Identify the object
Start by clearly identifying the object you’re analyzing. It’s crucial to have a clear understanding of the object’s shape, size, and orientation. This will help you accurately represent the forces acting on it.
2. Identify the forces
Identify all the forces acting on the object. This includes both contact forces, such as normal force and friction, as well as non-contact forces, such as gravity and tension. Consider the direction and magnitude of each force.
3. Use arrows to represent forces
Represent each force with an arrow. The length of the arrow corresponds to the magnitude of the force, while the direction of the arrow indicates its direction. Make sure your arrows are clear and labeled with the appropriate force.
4. Remember Newton’s laws
Keep Newton’s laws in mind when solving free body diagrams. Newton’s first law states that an object at rest or in motion will stay that way unless acted upon by an external force. Newton’s second law relates the net force on an object to its acceleration. Newton’s third law states that for every action, there is an equal and opposite reaction. These laws can guide your understanding of the forces in play.
5. Check for equilibrium
Finally, check if the object is in equilibrium or if there is a net force acting on it. If the vector sum of all the forces is zero, the object is in equilibrium. Otherwise, there is a net force, and the object will accelerate in the direction of the net force.
By following these tips, you can effectively solve free body diagrams and develop a solid understanding of the forces acting on objects in physics problems.
Common Mistakes to Avoid in Free Body Diagrams

Free body diagrams are an essential tool for understanding the forces acting on an object. They provide a visual representation of all the forces acting on an object and help in analyzing its motion. However, there are certain common mistakes that students often make when creating free body diagrams. It is important to be aware of these mistakes and avoid them to ensure accurate and effective analysis.
1. Missing or Incorrect Forces: One of the most common mistakes is failing to include all the forces acting on an object or including incorrect forces. It is essential to consider all the forces, such as gravity, normal force, friction, and applied forces. Additionally, it is important to correctly label the direction and magnitude of each force.
2. Overcomplicating the Diagram: Another mistake is over complicating the free body diagram by including unnecessary details. It is important to keep the diagram simple and focused on the forces that are directly influencing the motion of the object. Including excessive details can lead to confusion and make it difficult to analyze the forces accurately.
3. Inconsistent Scales and Proportions: Maintaining consistency in scales and proportions is crucial in free body diagrams. Using different scales or proportions for different forces can lead to inaccurate representation and misinterpretation of the forces acting on the object. It is recommended to use a consistent scale and proportion to ensure clear and accurate diagrams.
4. Not Indicating the Direction of Forces: Another common mistake is failing to indicate the direction of the forces. It is important to clearly indicate the direction of each force using arrows. This helps in understanding the net force acting on the object and predicting its motion.
5. Ignoring Newton’s Third Law: Newton’s Third Law states that for every action, there is an equal and opposite reaction. It is crucial to consider this law when creating free body diagrams. Failing to include the reaction forces can lead to incomplete and inaccurate diagrams.
By avoiding these common mistakes, students can create accurate and effective free body diagrams that provide a clear understanding of the forces acting on an object and help in analyzing its motion. Practicing the creation of free body diagrams and reviewing them for potential mistakes can greatly improve the ability to correctly analyze and solve problems involving forces.
Conclusion
Free body diagrams are an essential tool in physics for understanding the forces acting on an object. They allow us to visually represent the forces and their directions, helping us analyze and solve problems related to motion and equilibrium.
In this worksheet, we have practiced creating free body diagrams for various situations and solving problems using Newton’s laws of motion. By carefully examining the object in question, identifying all the forces acting on it, and representing them using arrows, we can gain a clearer understanding of the forces at play.
Remember, when creating a free body diagram, it is crucial to consider all the forces acting on the object, including gravitational forces, normal forces, frictional forces, and any applied or tension forces. By accurately representing these forces, we can determine the net force and ultimately predict or explain the motion of the object.
By completing this worksheet and understanding the principles behind free body diagrams, you are now better equipped to analyze and solve problems involving forces in a wide range of physics topics.
Keep practicing and reinforcing your understanding of free body diagrams, and you will continue to improve your problem-solving skills in physics.