
The evaporator temperature sensor is an important component of the air conditioning (AC) system in a vehicle. It is responsible for monitoring the temperature of the evaporator coil, which is located inside the AC unit. The sensor provides input to the AC control module, allowing it to regulate the cooling process and maintain the desired temperature in the vehicle.
If you suspect that the evaporator temperature sensor in your vehicle is faulty, testing it can help you to confirm the problem. In this article, we will discuss how to test the evaporator temperature sensor in a step-by-step manner.
Before testing the evaporator temperature sensor, make sure that the AC system is turned off and the engine is cool. This is important for your safety and to prevent any damage to the vehicle.
Understanding the evaporator temperature sensor
The evaporator temperature sensor is an essential component in the cooling system of a vehicle. It serves the purpose of monitoring the temperature of the evaporator coil, which is responsible for cooling the air that is circulated throughout the car’s cabin.
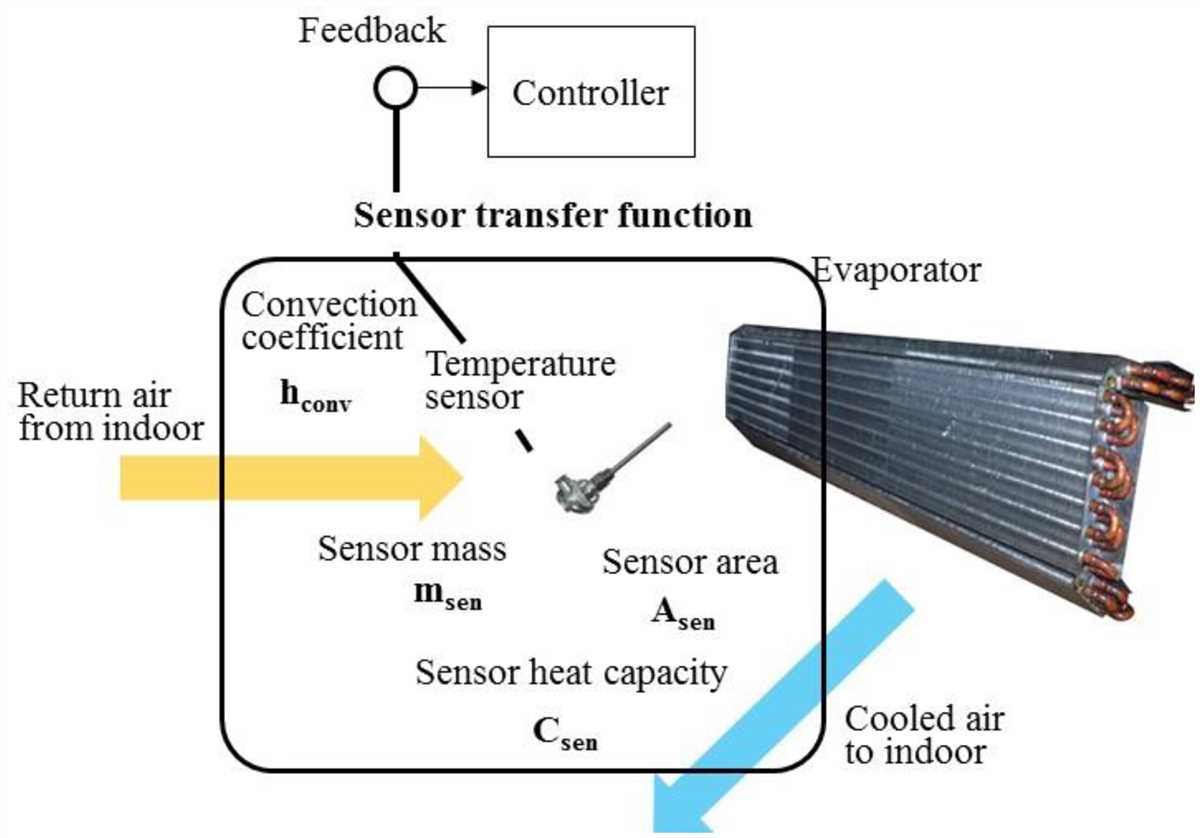
This sensor is typically located within the evaporator housing or near the evaporator coil itself. It works by measuring the temperature of the refrigerant flowing through the evaporator coil and sending this data to the vehicle’s electronic control unit (ECU).
The information provided by the evaporator temperature sensor is crucial for the proper operation of the air conditioning system. It helps the ECU determine the correct amount of refrigerant flow and regulate the compressor speed accordingly. This ensures that the evaporator coil remains at the optimal temperature for efficient cooling.
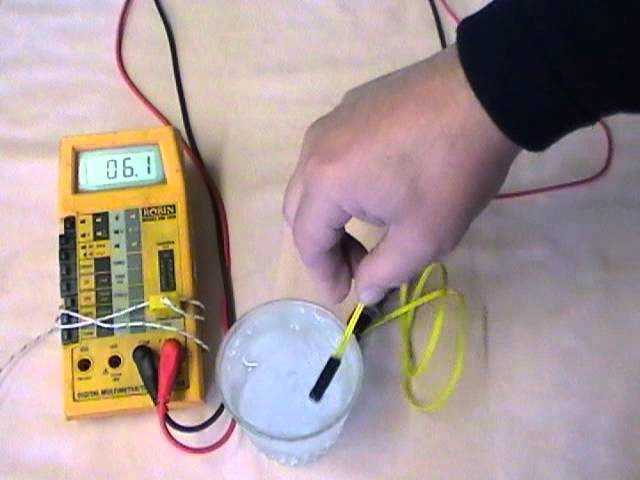
Testing the evaporator temperature sensor involves using a multimeter to measure its resistance. The resistance values should change as the temperature around the sensor changes. By comparing the measured values with the specifications provided by the vehicle manufacturer, you can determine if the sensor is functioning correctly or if it needs to be replaced.
- Start by identifying the location of the evaporator temperature sensor in your vehicle.
- Disconnect the electrical connector from the sensor.
- Set your multimeter to the resistance (ohms) setting.
- Touch the multimeter’s probes to the terminals of the sensor.
- Monitor the resistance values as the temperature changes around the sensor.
- Compare the measured values to the specifications provided by the vehicle manufacturer.
- If the resistance values deviate significantly from the specified range, it may indicate a faulty evaporator temperature sensor that needs to be replaced.
Regularly testing and maintaining the evaporator temperature sensor is crucial for ensuring the proper functioning of your vehicle’s air conditioning system. If you notice any issues with the cooling performance or abnormal temperature readings, it is advisable to have the sensor checked and replaced if necessary.
The role of the evaporator temperature sensor in the cooling system

The evaporator temperature sensor plays a crucial role in the cooling system of a vehicle. It is responsible for monitoring the temperature of the evaporator core, which is an essential component of the air conditioning system. The evaporator core is located inside the vehicle’s cabin and is responsible for cooling the air that is blown into the cabin.
The evaporator temperature sensor works by measuring the temperature of the refrigerant as it passes through the evaporator core. This information is then sent to the vehicle’s HVAC (Heating, Ventilation, and Air Conditioning) system, which uses it to regulate the cooling process. By constantly monitoring the evaporator temperature, the sensor allows the HVAC system to adjust the refrigerant flow and control the cooling of the air in the cabin.
The evaporator temperature sensor is essential for maintaining the efficiency and performance of the vehicle’s air conditioning system. If the sensor is faulty or malfunctioning, it can lead to problems such as inadequate cooling, inconsistent temperature control, or even total system failure. Therefore, regular testing and inspection of the evaporator temperature sensor is crucial to ensure the proper functioning of the cooling system.
Signs of a Faulty Evaporator Temperature Sensor
Evaporator temperature sensors play a crucial role in regulating the temperature of the air conditioning system in a vehicle. They are responsible for measuring the temperature of the refrigerant as it enters the evaporator, allowing the system to maintain optimal cooling performance. However, when the evaporator temperature sensor starts to malfunction, it can lead to several noticeable signs indicating a problem with the sensor.
Inaccurate Temperature Readings: One of the most common signs of a faulty evaporator temperature sensor is incorrect temperature readings. The sensor may provide readings that are significantly higher or lower than the actual temperature of the evaporator. This can result in the air conditioning system not cooling the vehicle properly, as the system relies on accurate temperature measurements to adjust refrigerant flow and maintain the desired temperature.
Inconsistent Cooling: Another sign of a faulty evaporator temperature sensor is inconsistent cooling. If the sensor is malfunctioning, it may not be able to accurately detect changes in the evaporator’s temperature, causing the system to struggle in maintaining a consistent cooling output. This can result in intermittent cooling or sudden changes in temperature, making the driving experience uncomfortable, especially in hot weather.
Erratic Fan Operation: The evaporator temperature sensor also plays a role in controlling the operation of the cooling fan. If the sensor is faulty, it may send incorrect signals to the cooling fan, causing it to either run continuously or not run at all. This can lead to overheating issues and potential damage to the air conditioning system.
Increased Fuel Consumption: A malfunctioning evaporator temperature sensor can also contribute to increased fuel consumption. When the sensor fails to accurately measure the temperature of the evaporator, the air conditioning system may have to work harder to maintain the desired cooling, putting an additional load on the engine. This increased strain can result in higher fuel consumption as the engine compensates for the added load.
In conclusion, a faulty evaporator temperature sensor can lead to various issues with the air conditioning system in a vehicle. It is important to monitor for signs such as inaccurate temperature readings, inconsistent cooling, erratic fan operation, and increased fuel consumption. If any of these signs are noticed, it is recommended to have the sensor inspected and replaced if necessary to ensure the proper functioning of the air conditioning system.
Common symptoms of a malfunctioning evaporator temperature sensor
The evaporator temperature sensor is a crucial component of the air conditioning system in a vehicle. Its main function is to monitor and regulate the temperature of the evaporator coil. When this sensor malfunctions, it can cause a range of symptoms that can affect the performance of the air conditioning system and the comfort of the occupants.
1. Inconsistent cooling
One of the most common symptoms of a faulty evaporator temperature sensor is inconsistent cooling. The sensor helps regulate the flow of refrigerant through the evaporator coil, which is responsible for cooling the air. If the sensor is not accurately reading the temperature, it may not send the correct signal to the air conditioning system, leading to uneven cooling or insufficient cooling.
2. Excessive cooling or freezing
In some cases, a malfunctioning evaporator temperature sensor may cause the air conditioning system to excessively cool or even freeze up. When the sensor fails to properly regulate the temperature, it can cause the evaporator coil to get too cold, leading to an overcooled or frost-covered evaporator coil. This can result in poor cooling performance and may even cause damage to the system.
3. Inaccurate temperature readings
If the evaporator temperature sensor is not functioning correctly, it may provide inaccurate temperature readings to the vehicle’s HVAC system. This can cause the system to misinterpret the actual temperature of the air and can lead to improper adjustments in the cooling settings. As a result, the cabin temperature may not be accurately controlled, and the comfort of the occupants may be compromised.
4. Air conditioning system cycling frequently

A malfunctioning evaporator temperature sensor can also cause the air conditioning system to cycle on and off more frequently than normal. The sensor plays a crucial role in regulating the temperature and controlling the compressor, which is responsible for circulating the refrigerant. If the sensor is not functioning properly, it may send incorrect signals to the system, leading to frequent and unnecessary cycling of the compressor.
5. Error codes or warning lights
In some cases, a malfunctioning evaporator temperature sensor may trigger error codes or warning lights on the vehicle’s dashboard. Modern vehicles are equipped with diagnostics systems that can detect faults in various components, including the evaporator temperature sensor. When a fault is detected, the system may trigger a warning light or display an error code, indicating the need for a sensor inspection or replacement.
Preparing for the test
Before testing the evaporator temperature sensor, there are a few steps that need to be taken to ensure accurate results.
Firstly, it is important to gather all the necessary tools and equipment. This may include a multimeter, wire connectors, a wiring schematic or diagram of the vehicle’s cooling system, and any specific tools recommended by the vehicle manufacturer.
Next, it is crucial to ensure the safety of the technician performing the test. This includes wearing appropriate personal protective equipment, such as safety glasses and gloves, and following any safety precautions outlined in the vehicle’s service manual.
Here are the steps to prepare for testing the evaporator temperature sensor:
- 1. Review the vehicle’s service manual: Familiarize yourself with the specific location and wiring of the evaporator temperature sensor in the vehicle. This information can usually be found in the electrical or cooling system sections of the manual.
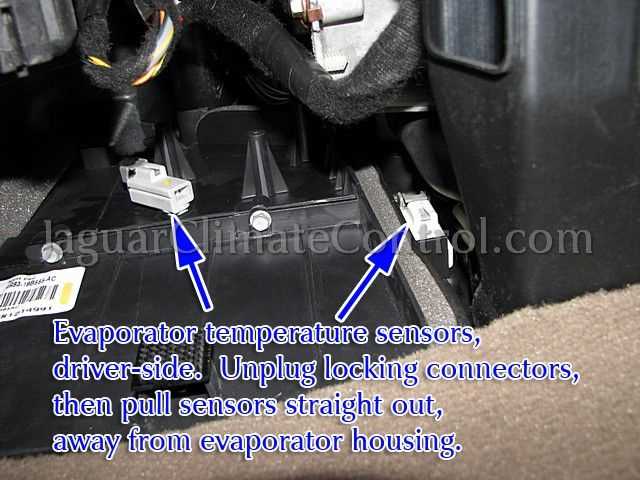
- 2. Locate the evaporator temperature sensor: Depending on the vehicle, the evaporator temperature sensor may be located within the HVAC (Heating, Ventilation, and Air Conditioning) system or integrated into the evaporator core itself. Refer to the service manual or diagram to locate the sensor.
- 3. Inspect the sensor and wiring: Before testing, visually inspect the sensor and its wiring for any signs of damage, loose connections, or corrosion. If any issues are found, they should be repaired or replaced before proceeding with the test.
- 4. Disconnect the sensor: In order to accurately test the evaporator temperature sensor, it is necessary to disconnect it from the vehicle’s wiring harness. This can usually be done by carefully unplugging the connector or by removing any retaining clips or screws.
- 5. Prepare the multimeter: Set the multimeter to the appropriate electrical measurement range for testing temperature sensors. This may be in resistance (ohms) or voltage (volts) depending on the type of sensor being tested. Consult the vehicle’s service manual or the multimeter’s instructions for specific guidance.
Following these steps will help ensure that the test is conducted accurately and safely. It is always recommended to consult the vehicle’s service manual for specific instructions and guidelines related to testing the evaporator temperature sensor.
Gathering the necessary tools and equipment
Before testing the evaporator temperature sensor, it is important to gather the necessary tools and equipment to ensure a successful and accurate assessment. Having the right tools on hand will make the testing process smoother and more efficient. Here are some essential items that you will need:
- Diagnostic scan tool: This tool is essential for retrieving the trouble codes from the vehicle’s onboard computer and accessing real-time data.
- Multimeter: A multimeter is used to measure voltage, resistance, and continuity. It will help you test the functionality of the sensor and check for any issues.
- Wiring diagram: It is important to have a wiring diagram specific to your vehicle make and model. This diagram will guide you in understanding the electrical connections and pin assignments for the sensor.
- Safety gear: It is always advisable to wear safety gear such as gloves and safety glasses when working on the vehicle’s components.
- Service manual: A service manual for your vehicle is an invaluable resource. It provides specific instructions and specifications for testing the evaporator temperature sensor.
By ensuring that you have these tools and equipment ready before starting the testing process, you will be well-prepared to accurately assess the functionality of the evaporator temperature sensor. This will enable you to diagnose any issues and make any necessary repairs or replacements.
Testing the evaporator temperature sensor
The evaporator temperature sensor is an important component of the air conditioning system in a vehicle. It is responsible for measuring the temperature of the refrigerant as it passes through the evaporator coil. By monitoring the evaporator temperature, the sensor helps regulate the cooling process and ensures that the air conditioning system is functioning properly.
To test the evaporator temperature sensor, you will need a digital multimeter. Here are the steps to follow:
- Locate the evaporator temperature sensor: The sensor is typically situated near the evaporator coil in the air conditioning system. Refer to the vehicle’s service manual to find the exact location.
- Disconnect the sensor: Once you have located the sensor, disconnect the electrical connector that is attached to it.
- Set the multimeter: Set your multimeter to the Ohms (Ω) or resistance setting. Make sure to select a range that can measure up to a few thousand ohms.
- Test the resistance: Place the multimeter probes on the terminals of the sensor to measure its resistance. Compare the reading on the multimeter with the specifications provided in the vehicle’s service manual. If the resistance value is within the specified range, the sensor is functioning correctly.
- Check for continuity: If the resistance reading is outside the specified range, check for continuity between the sensor terminals. Place one multimeter probe on each terminal and make sure the multimeter indicates continuity. No continuity indicates a faulty sensor that needs to be replaced.
Testing the evaporator temperature sensor is an essential step in diagnosing and troubleshooting any issues with the air conditioning system. By following these steps, you can ensure that the sensor is functioning correctly and accurately measuring the evaporator temperature.
Step-by-Step Guide to Performing the Test
Testing the evaporator temperature sensor is a relatively simple process that can help diagnose issues with your vehicle’s air conditioning system. Follow these steps to perform the test:
- Gather the necessary tools: Before starting the test, make sure you have the following tools on hand: a multimeter, a thermometer, and a wiring diagram of your vehicle’s air conditioning system.
- Locate the evaporator temperature sensor: Refer to your vehicle’s wiring diagram to locate the evaporator temperature sensor. It is typically located near the evaporator core, which is housed within the air conditioning system.
- Gain access to the sensor: Depending on the location of the sensor, you may need to remove certain components or panels to gain access. Follow the instructions in your vehicle’s service manual to correctly access the sensor.
- Disconnect the sensor: Once you have gained access to the sensor, disconnect it from the wiring harness. Use the multimeter to check for continuity between the sensor’s terminals. If there is no continuity, the sensor may be faulty and will need to be replaced.
- Test the sensor’s resistance: Reconnect the sensor to the wiring harness and set your multimeter to the resistance mode. Place the thermometer on the evaporator core and turn on the air conditioning system. Allow the system to run for a few minutes to stabilize the temperature. Use the multimeter to measure the resistance of the sensor. Compare the measured resistance to the specifications outlined in your vehicle’s service manual. If the resistance is outside of the specified range, the sensor may be faulty.
- Replace or repair the sensor: If the evaporator temperature sensor fails any of the above tests, it is likely faulty and will need to be replaced. Consult your vehicle’s service manual for the correct procedure to replace or repair the sensor.
In conclusion, testing the evaporator temperature sensor is a straightforward process that can help pinpoint issues with your vehicle’s air conditioning system. By following these step-by-step instructions, you can determine if the sensor is functioning properly or if it needs to be replaced. Remember to consult your vehicle’s service manual for specific instructions and specifications. Regularly testing and maintaining the components of your air conditioning system can ensure optimal performance and comfort during hot weather.
Q&A:
What is included in a step-by-step guide to performing the test?
A step-by-step guide to performing the test typically includes a detailed description of each task involved in the testing process. It outlines the specific steps that need to be followed, along with any necessary tools or equipment. The guide may also provide troubleshooting tips, safety precautions, and additional resources for further assistance.
Why is a step-by-step guide important for performing a test?
A step-by-step guide is important for performing a test because it helps ensure consistency and accuracy in the testing process. It serves as a reference for individuals who may be unfamiliar with the test or testing procedure, providing clear instructions that can be followed easily. Additionally, a step-by-step guide helps reduce the risk of errors or omissions during testing.
How should a step-by-step guide be organized?
A step-by-step guide should be organized in a logical and sequential manner. It should present the tasks in the order they need to be performed and provide clear instructions for each step. The guide should also include headings, subheadings, and bullet points to break down complex tasks into smaller, manageable steps. Visual aids such as diagrams or images can also be included to enhance understanding and clarity.
What are the benefits of using a step-by-step guide for performing a test?
Using a step-by-step guide for performing a test offers several benefits. Firstly, it helps eliminate confusion and uncertainty by providing clear instructions and guidelines. It also improves efficiency and productivity by streamlining the testing process and reducing the time spent on troubleshooting or searching for information. Additionally, a step-by-step guide promotes consistency and standardization in testing, ensuring that all tests are performed in the same manner for accurate and comparable results.