
Unlocking the mysteries of life’s blueprint begins with understanding the structure of DNA. In the field of genetics, DNA, or deoxyribonucleic acid, is considered the foundation of heredity and contains the instructions for building and maintaining an organism. To grasp the intricate structure of DNA, scientists often rely on paper models as visual aids.
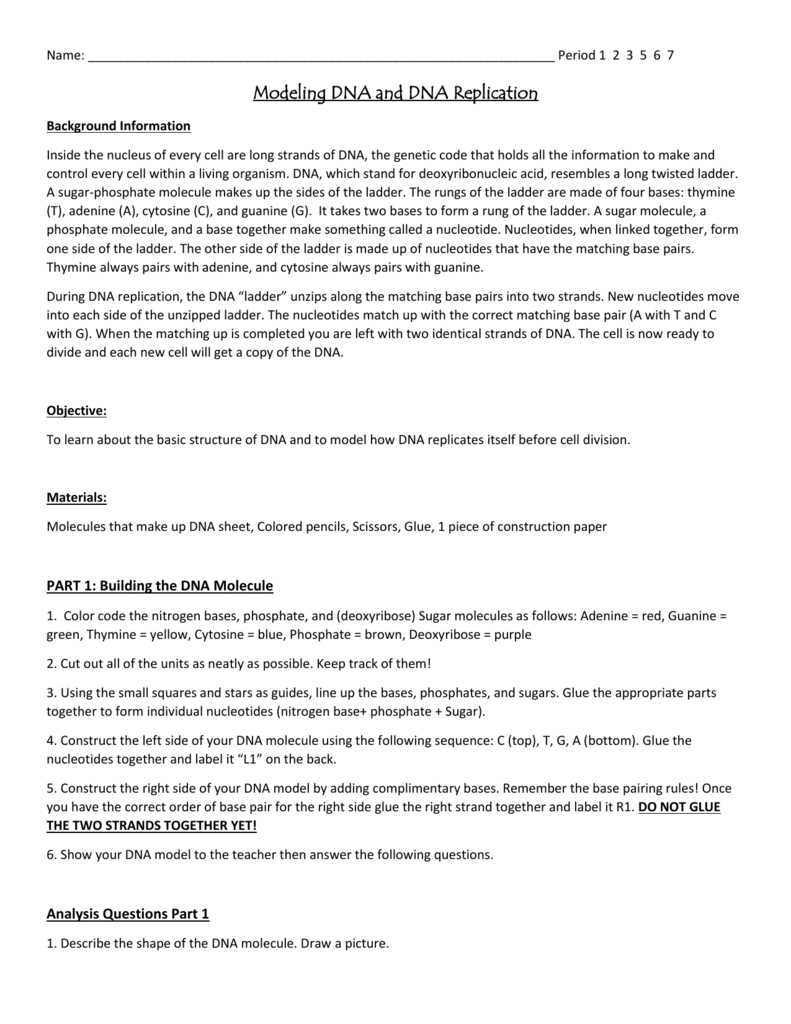
The DNA structure paper model lab provides an interactive and hands-on approach to learning about the components of DNA. Students are guided through the process of constructing a three-dimensional model of DNA using paper cutouts and a set of instructions. This lab activity helps students grasp the double helix structure of DNA and the role of nucleotides, base pairing, and hydrogen bonds in DNA replication.
The answer key for the DNA structure paper model lab serves as a valuable resource for students and educators alike. It provides a comprehensive breakdown of the model, highlighting the important features and detailing the steps involved. With the answer key, students can easily check their work and identify any mistakes or misconceptions they may have. Educators can also use the answer key to guide discussions and reinforce key concepts.
Overall, the DNA structure paper model lab and its answer key offer a dynamic and engaging way to explore the fundamental principles of genetics. By constructing a physical representation of DNA, students can better grasp its complex structure and appreciate its significance in the field of biology. Whether used in a classroom setting or as a home study resource, this lab activity and its answer key provide a foundation for future scientific exploration and discovery.
DNA Structure Paper Model Lab Answer Key: Understanding the Basics of DNA
For those studying the complex and fascinating world of genetics, understanding the structure of DNA is a fundamental concept. The DNA Structure Paper Model Lab provides a hands-on approach to grasping the basics of DNA by constructing a paper model. This lab is designed to engage students in a tactile and visual way, allowing them to see the structure of DNA firsthand.
The lab answer key serves as a guide to understanding the various components of the DNA structure paper model. It provides step-by-step instructions on how to assemble the model correctly, ensuring that students have a clear understanding of the structure of DNA.
Key components of the lab answer key:
- Base pairs: The lab answer key identifies the different types of base pairs in DNA, including adenine (A), thymine (T), guanine (G), and cytosine (C). Students can refer to the lab answer key to ensure they are correctly identifying and placing the base pairs in the model.
- Sugar-phosphate backbone: The lab answer key explains the role of the sugar-phosphate backbone in DNA. It highlights the alternating pattern of sugar and phosphate molecules, which provides stability and structure to the DNA molecule.
- Double helix structure: The lab answer key emphasizes the double helix structure of DNA, with two strands of nucleotides twisted around each other. It provides guidance on how to create this structure using the paper model.
- Antiparallel orientation: The lab answer key highlights the antiparallel orientation of the DNA strands, where one strand runs in the opposite direction to the other. Understanding this concept is crucial for accurately building the paper model.
By utilizing the lab answer key, students can gain a clearer understanding of the fundamentals of DNA structure. The visual and tactile experience of constructing the paper model, combined with the guidance provided in the answer key, allows students to grasp the intricate details of DNA more effectively. This lab serves as an important foundation for further exploration and study in the field of genetics.
Materials and Equipment Required for the Lab
In order to conduct the DNA structure paper model lab, several materials and equipment are required. These include:
- Paper: Sheets of paper are needed to create the paper models of DNA. It is recommended to use colored paper to differentiate between the different components of the DNA structure.
- Scissors: Scissors are necessary to cut out the paper components of the DNA model.
- Glue or tape: Glue or tape is essential to assemble the paper pieces together and create the final DNA structure.
- Markers or colored pencils: Markers or colored pencils are used to label and color the different parts of the DNA model, such as the nucleotides, sugar-phosphate backbone, and base pairs.
- Printed templates or diagrams: It is helpful to have printed templates or diagrams of the DNA structure to guide the assembly process and ensure accuracy.
- Rulers or straight edges: Rulers or straight edges can be useful to ensure straight and aligned cuts and folds in the paper components of the DNA model.
By having these materials and equipment ready, students can successfully engage in the DNA structure paper model lab and gain a better understanding of the molecular composition and arrangement of DNA.
Lab Procedure: Constructing the DNA Paper Model
In this lab, we will be constructing a DNA paper model to better understand the structure of DNA molecules. This model will allow us to visualize the double helix structure of DNA and the complementary base pairing that occurs between nucleotides. We will use colored paper strips to represent the nucleotides and connect them together to form the double helix.
To begin, gather the materials you will need for this lab: colored paper strips in four different colors (representing the four different nucleotides), scissors, tape or glue, and a template or diagram of the DNA structure. The template or diagram will serve as a guide for constructing the DNA paper model.
Step 1: Cut out the colored paper strips in equal lengths, ensuring that you have different colors for adenine, thymine, cytosine, and guanine. These colors will represent the different nucleotides in DNA.
Step 2: Begin by taking two paper strips, one representing adenine and the other thymine. These two nucleotides are complementary and will form a base pair. Fold the paper strips in half lengthwise to create a crease in the middle.
Step 3: Connect the adenine and thymine strips together by taping or gluing the ends of the strips, aligning the creases in the middle. This will represent the hydrogen bonds between the complementary base pairs.
Step 4: Repeat steps 2 and 3 for the cytosine and guanine paper strips, as these two nucleotides also form a complementary base pair.
Step 5: Connect the adenine-thymine and cytosine-guanine base pairs together by taping or gluing the ends, aligning the creases in the middle. This will create the double helix structure of DNA.
Step 6: Continue adding more base pairs to the DNA paper model until you have used all the nucleotide strips, following the pattern of adenine-thymine and cytosine-guanine base pairs. Ensure that the double helix structure is maintained and the nucleotides are connected correctly.
Step 7: Once the DNA paper model is complete, observe and analyze its structure. Observe how the nucleotides are arranged in a double-stranded helix and how the base pairs are complementary to each other.
Step 8: Reflect on the significance of the DNA structure in relation to its function in carrying genetic information and inheritance.
By constructing the DNA paper model, you will gain a hands-on understanding of the structure and organization of DNA molecules. This activity will enhance your understanding of the building blocks of life and their role in genetic processes.
Key Concepts: Exploring the Structure of DNA
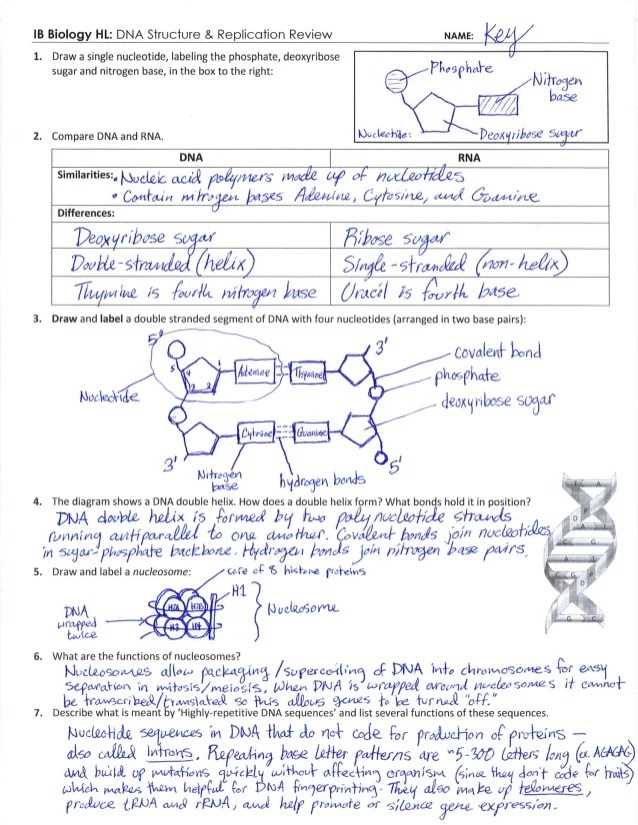
DNA, short for deoxyribonucleic acid, is a molecule that carries the genetic instructions used in the development and functioning of all known living organisms. Understanding the structure of DNA is crucial in unraveling its role in genetic processes and inheritance. The key elements of DNA structure include nucleotides, base pairing, the double helix, and complementary base pairing.
Nucleotides are the building blocks of DNA and consist of three parts: a sugar molecule (deoxyribose), a phosphate group, and a nitrogenous base. The four nitrogenous bases found in DNA are adenine (A), thymine (T), cytosine (C), and guanine (G). These bases form pairs with each other, with adenine always pairing with thymine (A-T) and cytosine always pairing with guanine (C-G).
The DNA molecule has a unique structure known as the double helix. It consists of two long strands that are twisted around each other in the shape of a twisted ladder. The sugar-phosphate backbones of each strand run in opposite directions, with the bases forming the steps of the ladder in the middle. This structure allows for stable storage and replication of genetic information.
Complementary base pairing is a fundamental concept in DNA structure. The specificity of base pairing ensures that each original DNA strand can serve as a template for the synthesis of a new complementary strand during DNA replication. This process is critical in the transmission of genetic information from one generation to the next.
Lab Analysis: Understanding the Results
In this lab, we conducted a paper model activity to understand the structure of DNA. By constructing a 3D model using cutouts of nucleotides and base pairing rules, we were able to visualize how DNA strands are made up of complementary base pairs.
During the lab, we observed that the paper model allowed us to clearly see the double helix structure of DNA. This structure consists of two strands that are twisted around each other, with the base pairs forming the rungs of the ladder. The model helped us understand that adenine (A) always pairs with thymine (T), and guanine (G) always pairs with cytosine (C).
Using the paper model, we were also able to understand the concept of DNA replication. We observed that the two strands of DNA can separate and serve as templates for the synthesis of new complementary strands. This process ensures that each new DNA molecule formed during replication carries the same genetic information as the original molecule.
Key Findings and Observations:
- The paper model clearly showed the double helix structure of DNA.
- We observed that adenine (A) always pairs with thymine (T), and guanine (G) always pairs with cytosine (C).
- The model helped us visualize how DNA replication occurs by separating the strands and synthesizing new complementary strands.
Conclusion:
The paper model lab provided us with a hands-on understanding of the structure and replication of DNA. It allowed us to visualize the double helix structure and the complementary base pairing rules. This knowledge is essential for comprehending the basic principles of genetics and DNA replication in living organisms.
Significance of the DNA Structure: Applications in Genetics
The discovery of the structure of DNA by Watson and Crick in 1953 revolutionized the field of genetics. The double helix structure of DNA allows for the replication and transmission of genetic information, and it also plays a crucial role in various genetic processes.
One important application of understanding the DNA structure is in the field of genetic testing. Genetic testing involves analyzing an individual’s DNA to identify genetic variations or mutations that may be associated with certain diseases or traits. Knowing the DNA structure helps scientists design specific tests to detect these variations and provide valuable information for diagnosis, treatment, and prevention of genetic disorders.
The DNA structure also plays a vital role in the study of gene expression and regulation. Genes are segments of DNA that contain instructions for making proteins, and understanding the DNA structure helps scientists decipher these instructions. By studying the interactions between DNA and specific proteins, researchers can gain insights into how genes are turned on and off, which is crucial for understanding the development and functioning of living organisms.
Additionally, the DNA structure has applications in the field of forensic science. DNA profiling, also known as DNA fingerprinting, involves comparing DNA samples to determine whether they come from the same individual. The unique sequence of bases in an individual’s DNA, combined with the double helix structure, makes it possible to identify individuals with a high degree of accuracy. This technique is widely used in criminal investigations and paternity testing.
Common Mistakes and Troubleshooting Tips
During the process of building a DNA structure paper model in a lab, there are several common mistakes that students may encounter. These mistakes can affect the accuracy of the model and may lead to incorrect observations or conclusions. It is important to be aware of these mistakes and learn how to troubleshoot them effectively.
Mistake 1: Misalignments

One common mistake is misalignments between the base pairs of the DNA model. This can happen when connecting the nucleotides or when attaching the complementary strands. To troubleshoot this issue, it is important to double-check the alignment of the base pairs and make sure each nucleotide is properly connected. You can refer to the key or model instructions for guidance.
Mistake 2: Incorrect Bonding
An additional mistake is incorrect bonding of the nucleotides in the DNA model. This can result in a weak or unstable structure that does not accurately represent the real DNA structure. To troubleshoot this issue, you should review the bonding patterns of nucleotides and ensure that the correct bonds are formed. It may also be helpful to compare your model with the key or reference materials to confirm the accuracy of the bonding.
Mistake 3: Missing Components
Another common mistake is missing components in the DNA structure paper model. This can occur when certain nucleotides or other key elements are accidentally omitted or misplaced. To troubleshoot this issue, carefully check the model instructions or key to ensure that all necessary components are present and in the correct locations. You may need to disassemble and rebuild certain sections of the model if any components are missing or incorrectly placed.
Mistake 4: Model Fragility
Lastly, a mistake that can occur is creating a fragile or unstable DNA model. This can lead to the model falling apart easily or not holding its shape properly. To troubleshoot this issue, make sure to use sturdy materials and reinforce the connections between nucleotides. Additionally, you can use glue or tape to secure the model’s structure and ensure that it remains intact during handling and observation.
By being aware of these common mistakes and following the troubleshooting tips provided, you can ensure a more accurate and reliable DNA structure paper model in the lab. This will enhance your understanding of DNA structure and improve the overall learning experience.