
When studying physics and mechanics, one of the fundamental concepts that students need to understand is the free body diagram. A free body diagram is a simplified representation of an object or system, showing all the external forces acting on it. These diagrams are used to understand the forces at work in a variety of situations, from simple everyday objects to complex mechanical systems.
In order to create an accurate free body diagram, it is important to identify and label all the forces acting on the object. This includes gravitational forces, normal forces, frictional forces, tension forces, and any other external forces that may be present. By representing these forces as labeled arrows, students can visualize the net force acting on the object and better understand its motion and equilibrium.
An answer key for free body diagrams is a valuable tool for students to check their work and ensure that they are correctly identifying and representing the forces at play. This answer key provides a step-by-step guide to creating free body diagrams, including examples and explanations for each type of force. By comparing their own diagrams to the answer key, students can identify any errors or misconceptions and make corrections to improve their understanding of the topic.
What is a Free Body Diagram?

A free body diagram is a diagrammatic representation of the forces acting on an object in a given situation. It is used to analyze the forces acting on an object and determine their magnitudes, directions, and interactions. Free body diagrams are commonly used in physics and engineering to solve problems related to the motion and equilibrium of objects.
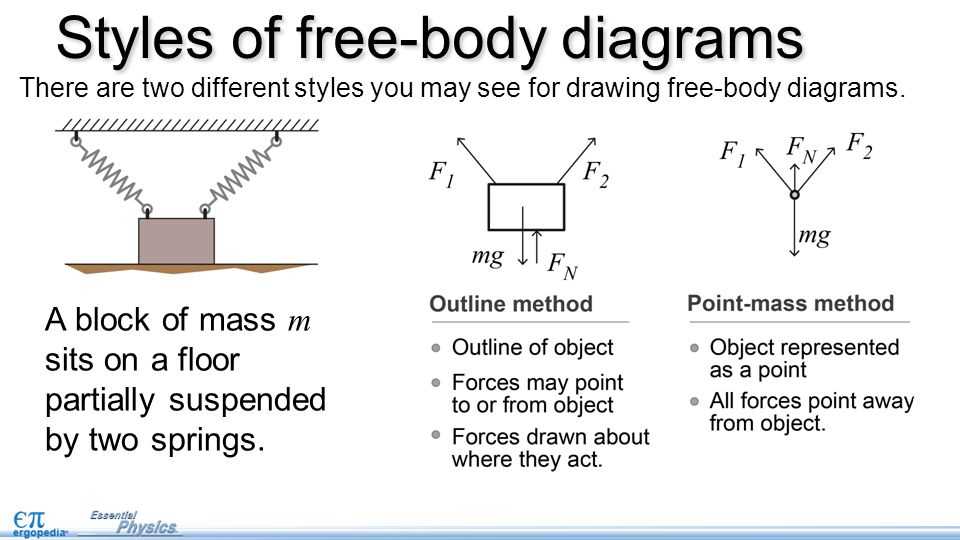
In a free body diagram, the object of interest is represented as a dot or a block, and all the external forces acting on it are represented as arrows. Each arrow represents the magnitude and direction of a force. The length of the arrow represents the magnitude of the force, while the arrow’s direction represents the force’s direction. The arrows are labeled with the names of the forces they represent, such as “gravity,” “friction,” or “tension.”
Free body diagrams are an important tool in physics because they allow for a visual representation of the forces acting on an object, making it easier to analyze and solve problems. By drawing a free body diagram, you can identify all the forces acting on an object and determine their effects on its motion. This information can then be used to calculate the object’s acceleration, velocity, or equilibrium conditions.
Why are Free Body Diagrams important?
Free Body Diagrams are an essential tool in physics and engineering to analyze and understand the forces acting on an object. They provide a visual representation of all the forces present, allowing for an accurate assessment of the object’s motion.
These diagrams help to simplify complex systems by breaking them down into individual forces. By isolating each force, it becomes easier to determine their magnitudes, directions, and interactions. This makes it possible to solve problems related to motion, equilibrium, and mechanical systems.
A free body diagram can be used to calculate the net force acting on an object, which in turn can determine its acceleration or determine if it is in equilibrium. This is done by summing up all the forces and applying Newton’s laws of motion. Having a clear visual representation of the forces involved makes it easier to apply these principles accurately.
Additionally, free body diagrams can aid in identifying any missing or unaccounted for forces. This is crucial in real-world scenarios where unexpected or unknown forces may be acting on an object. By carefully examining the diagram, engineers and physicists can identify and assess these additional forces, improving the accuracy of their calculations and predictions.
Key Points:
- Free body diagrams provide a visual representation of all the forces acting on an object.
- They simplify complex systems by breaking down forces into individual components.
- Free body diagrams facilitate the application of Newton’s laws of motion to solve problems related to motion, equilibrium, and mechanical systems.
- They help identify any missing or unaccounted for forces in real-world scenarios.
How to Create a Free Body Diagram
A free body diagram is a visual representation of the forces acting on an object. It is an important tool used in physics to analyze the motion and equilibrium of objects. Creating a free body diagram involves following a few steps:
- Identify the object: Begin by clearly identifying the object for which you want to create the free body diagram. This could be an object at rest or an object in motion.
- Draw the object: Draw a simple, labeled sketch of the object. This helps to visualize the object and its orientation.
- Identify the forces: Identify all the forces that act on the object. These forces could include gravity, friction, tension, normal force, and applied forces.
- Label the forces: Add labels to the diagram to indicate the type and direction of each force. Use arrows to represent the direction of the forces, with longer arrows indicating larger magnitudes.
- Choose a coordinate system: Choose a coordinate system that will make it easier to analyze the forces. This could be a Cartesian coordinate system or a polar coordinate system.
- Resolve the forces: Resolve the forces into their components along the chosen coordinate system. This involves breaking down each force into its horizontal and vertical components.
- Calculate the net force: Sum up all the horizontal and vertical components of the forces to calculate the net force acting on the object.
Creating a free body diagram allows you to visually understand the forces acting on an object and analyze its motion and equilibrium. It is an essential skill in physics and helps in solving problems related to forces and motion.
Identify the object
In the context of free body diagrams, it is important to accurately identify the object being studied. This allows us to visualize and understand the forces acting on the object. Let’s take a look at some examples:
Example 1:
- Object: A block resting on a table
- Forces: Gravity pulling the block downwards, normal force exerted by the table upwards
In this example, the object is a block that is at rest on a table. The forces acting on the block are gravity, which pulls the block downwards, and the normal force, which is exerted by the table and acts upwards. By accurately identifying the object as the block and the forces acting on it, we can draw a clear free body diagram.
Example 2:
- Object: A car accelerating on a horizontal road
- Forces: Gravity pulling the car downwards, normal force exerted by the road upwards, friction force opposing the motion
In this example, the object is a car that is accelerating on a horizontal road. The forces acting on the car include gravity, which pulls the car downwards, the normal force exerted by the road, which acts upwards, and the friction force, which opposes the motion. By accurately identifying the object as the car and the forces acting on it, we can create a free body diagram that represents the forces involved.
Overall, identifying the object accurately in free body diagrams is crucial for understanding and visualizing the forces acting on it. This allows us to analyze the motion and determine the net force acting on the object.
Identify the forces acting on the object
When analyzing the motion of an object, it is important to identify and understand the forces acting on it. By doing so, we can determine how these forces affect the object’s motion and ultimately make predictions about its behavior. To identify these forces, we need to consider the various interactions that the object has with its surroundings.
There are several types of forces that can act on an object. One of the most common forces is gravity, which is the force that pulls an object towards the center of the Earth. Another important force is friction, which opposes the motion of an object and can act in different directions. Other forces include normal force, tension, applied force, and air resistance.
- Gravity: This force is always directed downwards towards the center of the Earth and depends on the mass of the object.
- Friction: Friction can act in different directions depending on the situation. It opposes the motion of the object and its magnitude depends on the surfaces in contact and the force pressing them together.
- Normal force: This force acts perpendicular to the surface of contact and counteracts the force exerted by the object on the surface.
- Tension: Tension is a force that is transmitted through a string, rope, or cable and is directed along the length of the string.
- Applied force: This is a force that is applied directly to the object by a person or another object.
- Air resistance: When an object moves through the air, it experiences a resistance force that is opposite to its motion. This force depends on the speed and shape of the object.
By identifying and considering these forces in a free body diagram, we can accurately analyze the motion of an object and understand the factors that influence its movement.
Draw the Free Body Diagram
The first step in solving any physics problem involving forces is to draw a Free Body Diagram (FBD). A Free Body Diagram is a simplified representation of an object showing all the forces acting on it. By examining the FBD, we can determine the net force and apply Newton’s laws of motion to solve the problem.
To draw a FBD, we start by identifying the object of interest and represent it as a dot or a box. Then, we consider all the forces acting on the object and draw arrows to represent their direction and magnitude. The length of the arrows indicates the relative strength of the forces.
The key to drawing an accurate FBD is to carefully analyze the problem and identify all the relevant forces. Some common forces to consider include gravity, normal force, friction, tension, and applied forces. For example, if a person is standing on a flat surface, the forces acting on them would include their weight (gravity), the normal force exerted by the ground, and any frictional force present.
Once all the forces are identified and drawn on the FBD, we can analyze the diagram to determine the net force acting on the object. This is done by adding or subtracting the forces vectorially. The net force is crucial in determining the object’s acceleration and motion.
In conclusion, drawing a Free Body Diagram is an essential step in solving physics problems involving forces. It allows us to visualize and analyze the forces acting on an object, leading to a better understanding of its motion. By accurately drawing the FBD, we can apply Newton’s laws of motion to solve the problem effectively.
Common Types of Forces in Free Body Diagrams
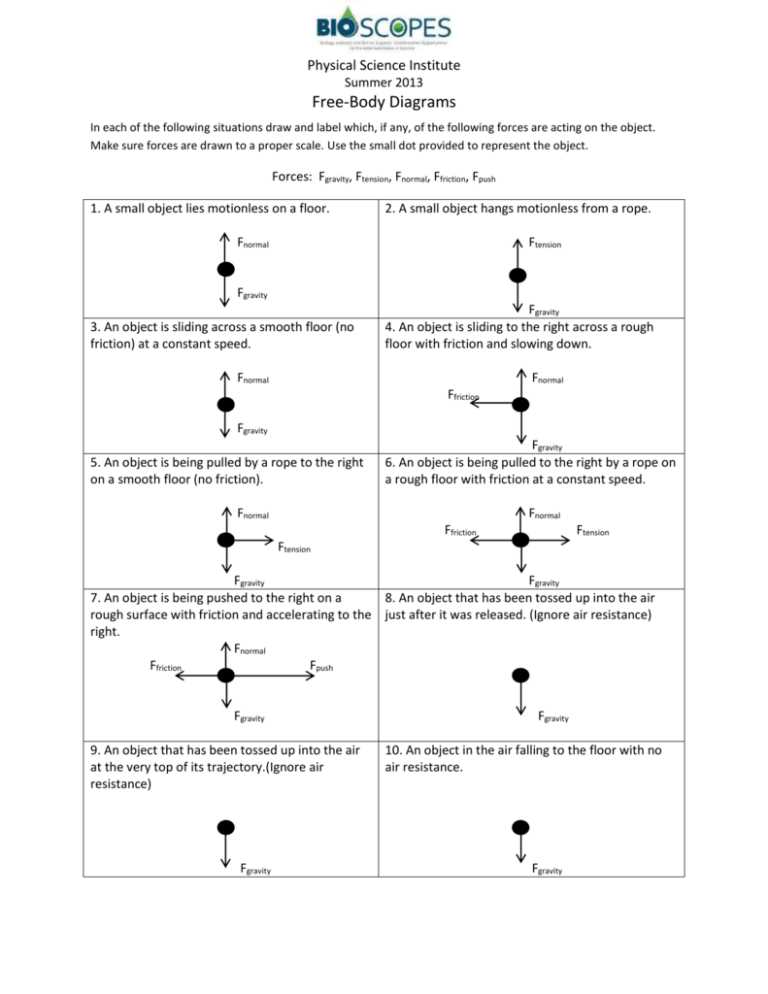
Free body diagrams are a visual representation of the forces acting on an object in a given situation. These diagrams are used to analyze the motion and determine the net force acting on the object. There are several common types of forces that are often represented in free body diagrams:
- Gravity: Gravity is a force that attracts objects towards each other. It is always directed towards the center of the Earth and is represented by a downward arrow in free body diagrams. The weight of the object is a measure of the gravitational force acting on it.
- Normal force: The normal force is the force exerted by a surface to support the weight of an object resting on it. It acts perpendicular to the surface and counteracts the force of gravity. In free body diagrams, the normal force is represented by an arrow pointing away from the surface.
- Tension: Tension is the force transmitted through a string, rope, or cable when it is pulled tight. It is represented by an arrow in the direction of the force in free body diagrams.
- Friction: Friction is a force that opposes the motion of an object when it is in contact with a surface. There are two types of friction: static friction, which prevents the object from moving, and kinetic friction, which acts when the object is in motion. In free body diagrams, friction is represented by an arrow opposite to the direction of motion.
These are just a few examples of the common types of forces that can be represented in free body diagrams. It is important to accurately identify and represent all the forces acting on an object in order to analyze its motion and calculate the net force.
Gravity
Gravity is a fundamental force that attracts two objects with mass towards each other. It is responsible for keeping our feet on the ground and for the orbits of planets around the sun. The force of gravity is always attractive, meaning it pulls objects towards each other, rather than pushing them apart.
The force of gravity is directly proportional to the mass of the objects and inversely proportional to the square of the distance between them. This means that the more massive an object is, the stronger its gravitational pull. Similarly, the closer two objects are to each other, the stronger the force of gravity between them.
Gravity is a force that acts on all objects, regardless of their size or shape. It is the reason why objects fall to the ground when dropped, and why projectiles follow a curved path called a parabola. The force of gravity also affects the motion of objects in space, determining the shape and stability of planetary orbits.
On Earth, the acceleration due to gravity is approximately 9.8 meters per second squared (m/s^2). This means that an object in free fall near the Earth’s surface will accelerate at a rate of 9.8 m/s^2. The acceleration due to gravity remains constant regardless of the mass of the object, which is why all objects fall at the same rate in a vacuum.
Key Points:
- Gravity is a fundamental force that attracts objects with mass towards each other.
- The force of gravity is directly proportional to the mass of the objects and inversely proportional to the square of the distance between them.
- Gravity affects the motion of objects on Earth and in space, determining the shape of orbits and the path of projectiles.
- The acceleration due to gravity on Earth is approximately 9.8 m/s^2.