
The Lab 2 5 Testing Mode is a valuable tool for testing and troubleshooting computer systems. This mode allows users to modify and configure the UEFI (Unified Extensible Firmware Interface) setup, which is essential for the proper functioning of a computer’s hardware and software.
In this article, we will explore the benefits and features of the Lab 2 5 Testing Mode, focusing specifically on how it can be used to optimize the performance and stability of a computer system. We will also discuss how to access and navigate the UEFI setup, as well as highlight some common configuration options that are available.
By leveraging the Lab 2 5 Testing Mode and the UEFI setup, users can gain greater control over their computer’s hardware and software settings. This level of control can be especially useful for gamers, professionals, and enthusiasts who demand high performance from their systems. With the ability to fine-tune components such as the CPU, memory, and storage devices, users can achieve optimal performance for their specific needs.
In conclusion, the Lab 2 5 Testing Mode and UEFI setup offer a powerful platform for testing and configuring computer systems. Whether you are a casual user or a power user, taking advantage of these tools can help you optimize your system’s performance, stability, and overall experience. So, dive into the Lab 2 5 Testing Mode and unlock the full potential of your computer!
Lab 2: 5 Testing Mode Using UEFI Setup
In this lab, we will explore the testing mode using the Unified Extensible Firmware Interface (UEFI) setup. UEFI is a modern standard firmware interface for computers, replacing the traditional BIOS. It provides an environment for initializing and testing the hardware before loading the operating system.
The UEFI setup offers various testing modes to diagnose and troubleshoot hardware issues. These testing modes include memory testing, CPU testing, and device testing. By accessing the UEFI setup, you can run these tests to ensure that your computer components are functioning properly.
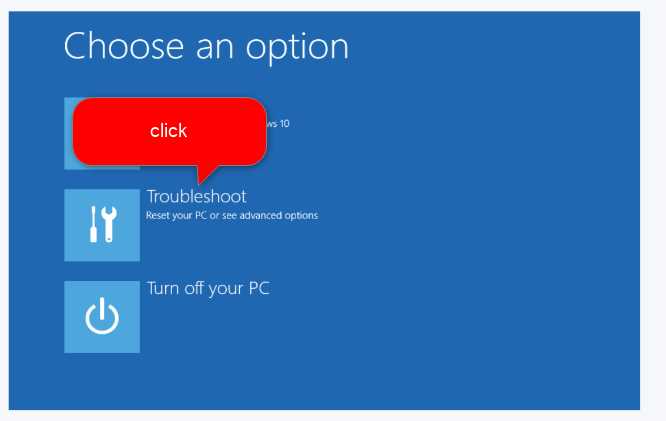
To enter the UEFI setup, you need to restart your computer and press a specific key or combination of keys during the startup process. The exact key or key combination depends on your computer’s manufacturer. Once you are in the UEFI setup, navigate to the testing options and select the desired testing mode.
Memory Testing
Memory testing is an essential part of troubleshooting hardware issues. It helps to identify any errors or faults in the computer’s RAM (Random Access Memory). By running a memory test in the UEFI setup, you can determine whether any memory modules are faulty or need to be replaced.
CPU Testing
CPU testing allows you to check the performance and stability of your computer’s processor. By running a CPU test in the UEFI setup, you can ensure that the processor is functioning correctly and operating at its optimal speed. This can help identify any issues related to overheating or improper voltage settings.
Device Testing
Device testing in the UEFI setup allows you to test individual hardware components such as the hard drive, graphics card, and network adapter. By running device tests, you can verify that these components are working properly and detect any potential problems.
Overall, the UEFI setup provides a comprehensive testing environment to diagnose and resolve hardware issues. By utilizing the testing modes available, you can ensure the stability and performance of your computer system.
Understanding UEFI Setup
UEFI, or Unified Extensible Firmware Interface, is a modern replacement for traditional BIOS firmware. It provides an interface for managing various hardware settings and configurations on a computer system. One of the key components of UEFI is the UEFI Setup utility, which allows users to access and modify these settings.
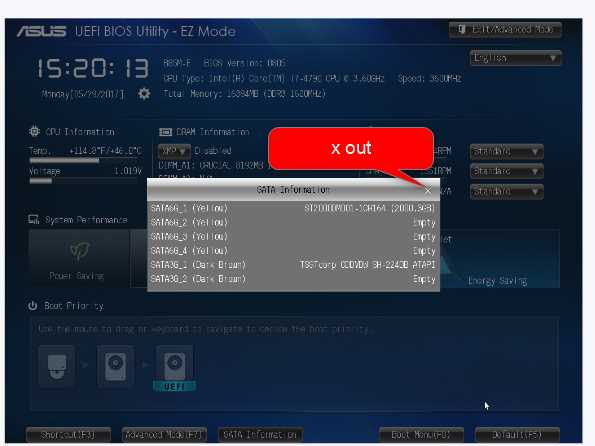
When you access the UEFI Setup utility, you are greeted with a graphical interface that provides an overview of the system’s hardware configuration. It includes options for managing the boot order, configuring storage devices, adjusting memory settings, and much more. The UEFI Setup utility is typically accessed by pressing a specific key (such as F2 or Del) during the system’s boot process.
The UEFI Setup utility is organized into different tabs or sections, each focusing on a specific category of settings. These categories may include boot settings, security options, power management, and hardware configurations. The options within each section can vary depending on the specific computer system and motherboard.
Some common settings that you may encounter in the UEFI Setup utility include:
- Boot order: This allows you to specify the order in which the computer searches for a bootable operating system. You can prioritize different storage devices such as hard drives, SSDs, or optical drives.
- Secure Boot: This feature helps to ensure that only trusted operating systems and software are booted on the system. It verifies the integrity of the bootloader and prevents the execution of malicious code.
- Overclocking: UEFI Setup may include options for adjusting the CPU clock speed, RAM frequency, and voltage settings. Overclocking can improve system performance but should be done cautiously and with proper knowledge.
- Security settings: UEFI Setup provides options for configuring passwords, enabling or disabling hardware-based security features (such as TPM), and managing system-level security protocols.
Overall, the UEFI Setup utility plays a crucial role in managing a computer system’s hardware configuration. It provides users with control over various settings, allowing them to customize and optimize their systems based on their specific needs and requirements
Configuring Testing Mode
Testing mode is an essential feature in the UEFI setup, as it allows users to perform various tests and diagnostics on their system. By enabling testing mode, users can ensure that their hardware and software are functioning correctly and detect any potential issues or errors.
To configure testing mode in the UEFI setup, follow these steps:
- Restart your computer and access the UEFI setup by pressing the designated key during startup (e.g., F2 or Delete).
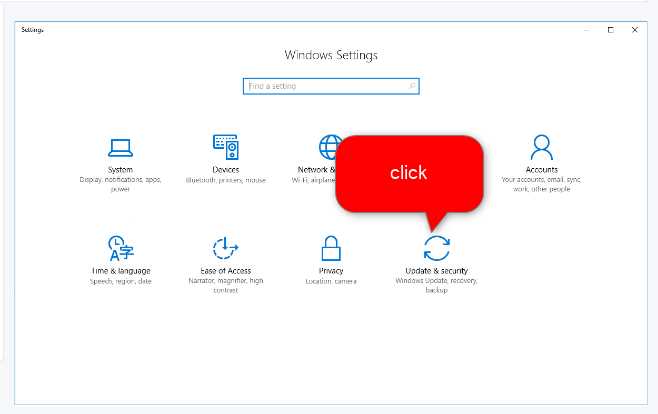
- Navigate to the “Settings” or “Configuration” menu, and look for an option related to testing mode. It may be labeled as “Testing Mode,” “Diagnostic Mode,” or something similar.
- Select the testing mode option and enable it by changing the value to “On” or “Enabled”.
- Save your changes and exit the UEFI setup. Your computer will restart.
Once testing mode is enabled, you can perform various tests and diagnostics to ensure the stability and functionality of your system. Some common options available in testing mode include:
- Memory tests: These tests check the integrity of your system’s memory modules and identify any potential errors or defects.
- Hardware diagnostics: These tests assess the health and performance of various hardware components, such as the CPU, GPU, storage devices, and networking interfaces.
- System stability tests: These tests put your system under heavy load to assess its stability and identify any weaknesses or overheating issues.
- Operating system diagnostics: These tests check the compatibility and functionality of the installed operating system, ensuring that all drivers and system files are working correctly.
It’s important to note that testing mode should only be used by advanced users or technicians, as it can potentially cause data loss or system instability. It’s recommended to backup your important files before performing any tests or diagnostics in testing mode.
Benefits of Testing Mode
Testing mode, also known as the UEFI (Unified Extensible Firmware Interface) setup, offers several benefits for users. This mode allows for comprehensive testing and troubleshooting of computer hardware and software, ensuring that the system is working optimally and identifying any potential issues. Here are some key benefits of using testing mode:
- Diagnostic capabilities: Testing mode provides advanced diagnostic capabilities that allow users to identify and resolve issues with their computer systems. It allows for checking system components, such as memory, hard drives, and peripherals, to ensure they are functioning correctly.
- Access to advanced settings: Testing mode grants users access to advanced settings and configurations that are not available in regular operation. This includes options for adjusting system performance, controlling device boot order, and managing system firmware. These settings can be useful for fine-tuning the system for specific needs.
- Compatibility testing: Testing mode allows users to test the compatibility of different software and hardware configurations. This is particularly useful for system integrators and developers who need to ensure that their applications or devices can work seamlessly with the system. It helps to identify any compatibility issues before deploying them in a production environment.
- Enhanced security: Testing mode provides additional security measures by allowing users to verify the integrity of the system firmware. Users can use secure boot options to ensure that the system boots only with trusted and verified firmware, protecting against potential malware or unauthorized modifications.
Overall, testing mode offers users a powerful tool for testing, diagnosing, and optimizing their computer systems. It provides access to advanced settings and diagnostic capabilities, allowing for better performance, compatibility, and security. Whether you are a system administrator, developer, or an advanced user, testing mode can be an invaluable resource for maintaining and improving your system.
Disadvantages of Testing Mode
While testing mode can be a helpful tool for system administrators and IT professionals, it also comes with several disadvantages. One of the main drawbacks is the potential for increased vulnerability to security threats. When the system is in testing mode, it bypasses many of the security features and safeguards that are in place during normal operation. This can leave the system more susceptible to malware, viruses, and other cyber attacks.
Another disadvantage of testing mode is the possibility of system instability. Since testing mode allows for experimentation and changes to be made to the system, there is a greater chance of encountering bugs, errors, and crashes. These issues can disrupt normal operation and potentially lead to data loss or other negative consequences.
Additionally, testing mode can be time-consuming and resource-intensive. Running the system in this mode requires additional time and effort to set up and configure. It may also require the allocation of additional hardware or virtual resources. This can be a burden for organizations with limited resources or tight schedules.
In conclusion, while testing mode can be useful for certain purposes, it is important to consider the potential disadvantages. Increased vulnerability to security threats, system instability, and resource requirements are all factors that should be taken into account before implementing testing mode in a system.
Troubleshooting Common Issues
When using UEFI setup in testing mode, there are several common issues that users may encounter. Understanding these issues and how to troubleshoot them can help ensure a smooth and efficient testing process.
1. Failure to boot into UEFI setup
If your system fails to boot into UEFI setup, there are a few things you can try. First, check that your system meets the minimum requirements for UEFI setup. Ensure that your BIOS is up to date and supports UEFI. Additionally, double-check your boot order settings to ensure that the UEFI setup option is selected as the primary boot device. If these steps do not resolve the issue, you may need to seek further assistance from your system manufacturer or a technical expert.
2. Error messages during UEFI setup
If you encounter error messages during the UEFI setup process, it is important to pay attention to the specific details provided. Error messages can indicate issues with hardware compatibility, partitioning, or other configuration settings. Referencing the documentation provided with your system or consulting online resources may provide guidance on how to resolve these specific error messages. Additionally, reaching out to your system manufacturer or seeking assistance from a technical expert can help you troubleshoot and resolve these issues.
3. System instability or crashes during testing
If your system experiences instability or crashes during the testing process, there are a few steps you can take to troubleshoot the issue. First, ensure that you have installed all necessary drivers and updates for your hardware. Updating the BIOS to the latest version can also help resolve compatibility issues. Additionally, running diagnostic tests on your hardware components, such as memory or storage, can help identify any faulty components. If the issue persists, it may be necessary to reinstall the operating system or seek further assistance.
4. Inability to save changes in UEFI setup
If you are unable to save changes made in UEFI setup, there may be a few reasons for this. First, ensure that you have administrative privileges and are logged in as the administrator. Some settings in UEFI setup may require specific permissions to be modified. Additionally, check that there is enough available storage space on your system for the changes to be saved. If the issue persists, it may be necessary to reset the UEFI settings to their default values or seek further assistance.
By understanding and troubleshooting these common issues, users can optimize their experience when using UEFI setup in testing mode. Remember to consult the documentation provided with your system and reach out for assistance when needed to ensure a successful testing process.
Best Practices for UEFI Setup Testing
When testing the UEFI setup, there are several best practices that can help ensure a smooth and successful testing process. These practices involve careful planning, attention to detail, and thorough documentation of the testing procedures.
Create a Test Plan
A comprehensive test plan should be created before starting the UEFI setup testing. This plan should outline the objectives of the testing, the specific scenarios and configurations to be tested, and the expected outcomes. By having a well-defined test plan, it becomes easier to track progress and identify any areas that require further testing.
Use a Test Environment
It is crucial to have a dedicated test environment for conducting UEFI setup testing. This environment should closely resemble the production environment to ensure accurate results. The test environment should be isolated from the production environment to prevent any unwanted changes or disruptions. Additionally, it is recommended to have multiple systems available for testing to simulate different hardware configurations.
Thoroughly Document Testing Procedures
During the UEFI setup testing, it is important to document all steps and procedures followed. This documentation should include detailed information about the sequence of actions performed, any errors encountered, and the corresponding resolutions. This documentation serves as a valuable resource for troubleshooting and can provide insights for future testing.
Perform Systematic Testing
The UEFI setup testing should be carried out in a systematic manner, covering all relevant parameters and configurations. The testing should include functional testing to ensure that all desired features and functionalities are working as expected. Additional testing can be conducted to assess performance, compatibility, and security aspects. By performing comprehensive and systematic testing, potential issues can be identified and addressed early on.
In conclusion, following these best practices can enhance the effectiveness and efficiency of UEFI setup testing. Careful planning, a dedicated test environment, thorough documentation, and systematic testing are key factors in ensuring a successful testing process.