
Hardware RAID (Redundant Array of Independent Disks) provides a reliable and efficient solution for data storage and backup. By combining multiple physical hard drives into a single logical unit, hardware RAID offers improved performance, increased capacity, and the ability to withstand data loss in the event of a drive failure. In this lab, we will explore the process of installing hardware RAID and enabling the testing mode to ensure its proper functioning.
Before diving into the installation process, it is essential to understand the different RAID levels available. RAID 0 offers striping without redundancy, resulting in enhanced performance but no data protection. RAID 1 provides mirroring for redundancy, where data is simultaneously written to multiple drives. RAID 5 combines striping and parity, distributing data and parity information across all drives in the array. Determining the appropriate RAID level for your specific needs is crucial for a successful installation.
The installation of hardware RAID typically involves the following steps: choosing the appropriate RAID controller, installing the controller card into an available slot on the motherboard, connecting the hard drives to the controller, and configuring the RAID level using the controller’s management software. It is important to consult the manufacturer’s documentation for specific instructions tailored to your hardware.
Understanding Lab 5 5 testing mode
Lab 5 5 testing mode is a crucial aspect of the installation process for hardware RAID systems. In this mode, various tests are performed to ensure the functionality and reliability of the RAID array. These tests help identify any potential issues or errors that may arise during operation.
One of the key tests in lab 5 5 testing mode is the verification of the RAID configuration. This involves checking if all the hard drives in the array are properly detected and recognized by the RAID controller. Any discrepancies or failures in detection can indicate a problem with the hardware or the configuration setup.
Another important test is the initialization of the RAID array. This process involves formatting the drives and setting them up to work in a synchronized manner. It ensures that the storage capacity of the drives is combined and that data can be distributed across them efficiently. The initialization process also checks for any errors or inconsistencies in the array and corrects them if necessary.
Lab 5 5 testing mode also includes stress tests to evaluate the performance and stability of the RAID system under heavy loads. These tests simulate demanding scenarios where the RAID array is subjected to high data transfer rates or simultaneous read and write operations. By monitoring the system’s response and performance during these tests, any weaknesses or bottlenecks in the system can be identified and addressed.
Overall, lab 5 5 testing mode is an essential part of the installation process for hardware RAID systems. It ensures that the system is properly configured, the drives are functioning correctly, and the performance meets the desired standards. By conducting these tests, any potential issues can be detected and resolved before the RAID system is put into production, minimizing the risk of data loss or system failure.
Preparing for Lab 5 5 Testing Mode
Before starting Lab 5 5 Testing Mode, it is important to properly prepare the hardware RAID system. This lab focuses on installing and configuring the hardware RAID, so it is essential to have all the necessary components and tools ready.
First, ensure that you have the required RAID controller card. This card is responsible for managing the RAID arrays and providing the necessary functionality. Check the specifications of the server or computer to determine the compatible RAID controller card.
Once you have the RAID controller card, make sure you have the appropriate cables and connectors. These will be needed to connect the RAID controller card to the hard drives or SSDs. Refer to the documentation of the RAID controller card for information on the supported cables and connectors.
Before installing the hardware RAID, ensure that the computer or server is powered off and disconnected from the power source. Opening the case and working with internal components should always be done with caution to avoid any damage to the system or risk of electric shock.
Once you have prepared the necessary components and ensured that the system is powered off, you can proceed with installing the hardware RAID. Follow the manufacturer’s instructions for installing the RAID controller card and connecting the cables to the hard drives or SSDs. Make sure all connections are secure and properly aligned.
After the hardware RAID is installed, you can proceed to configure the RAID arrays and set up the desired RAID levels. This process will vary depending on the RAID controller card and software used. Refer to the manufacturer’s documentation or software interface for guidance on configuring the RAID arrays.
Once the hardware RAID is properly installed and configured, you can proceed with Lab 5 5 Testing Mode. This lab will allow you to test the functionality and performance of the RAID arrays, ensuring that they are set up correctly and functioning as expected.
Choosing the right hardware RAID
Hardware RAID (Redundant Array of Independent Disks) is a method of storing data across multiple hard disk drives to improve performance, reliability, and overall efficiency. When choosing a hardware RAID solution, there are several important factors to consider.
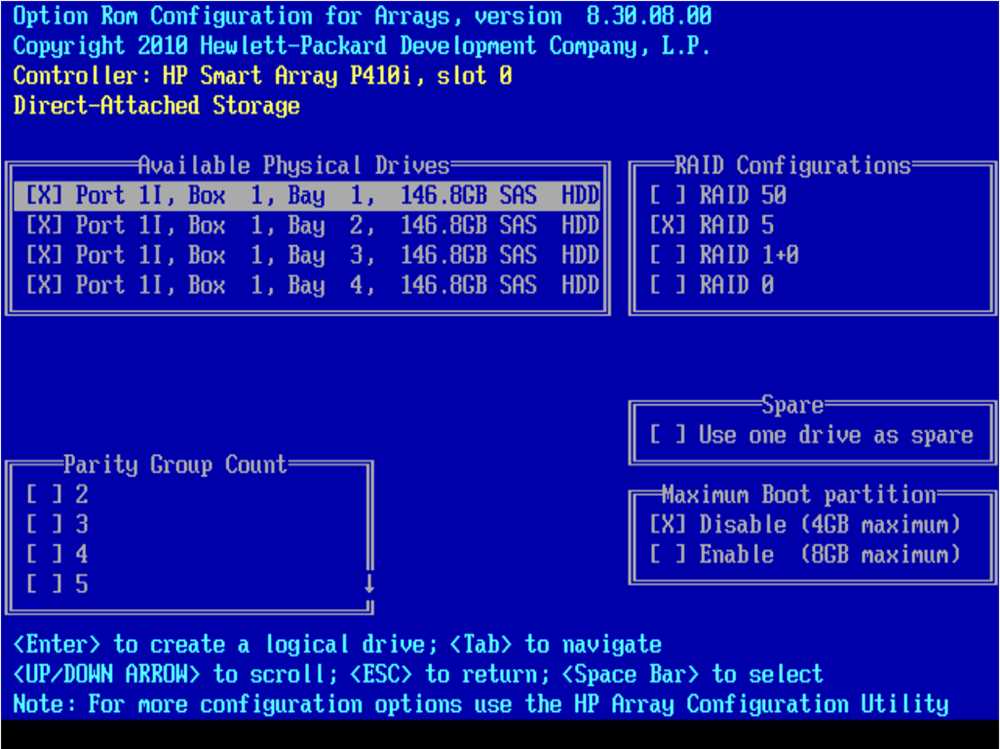
1. RAID levels: There are several RAID levels to choose from, each with its own advantages and disadvantages. The most common RAID levels include RAID 0, RAID 1, RAID 5, and RAID 10. RAID 0 offers improved performance but no fault tolerance, while RAID 1 provides data redundancy but does not improve performance. RAID 5 combines performance and fault tolerance, while RAID 10 offers both high performance and fault tolerance.
2. Performance: The performance of a hardware RAID solution can vary significantly depending on factors such as the number and type of hard drives used, the RAID controller’s capabilities, and the RAID level selected. It is important to consider your specific performance requirements and choose a RAID solution that can meet those needs.
3. Fault tolerance: One of the main advantages of hardware RAID is its ability to provide fault tolerance, allowing for the continued operation of the system in the event of a hard drive failure. When choosing a hardware RAID solution, consider the level of fault tolerance needed for your data and choose a RAID level that can provide the desired level of redundancy.
4. Scalability: It is important to consider the scalability of a hardware RAID solution, especially if you anticipate the need to expand your storage capacity in the future. Some RAID controllers and systems offer the ability to easily expand the array by adding more hard drives, while others may have limitations on the number of drives that can be added.
5. Compatibility: Before choosing a hardware RAID solution, make sure it is compatible with your existing hardware and operating system. Not all RAID controllers are compatible with all operating systems, so it is important to check the compatibility requirements.
6. Price: Hardware RAID solutions can vary significantly in price, depending on factors such as the RAID level, number of drives, and controller capabilities. It is important to consider your budget and choose a RAID solution that offers a balance between performance, fault tolerance, and price.
In conclusion, choosing the right hardware RAID solution requires careful consideration of factors such as RAID levels, performance, fault tolerance, scalability, compatibility, and price. By taking these factors into account, you can ensure that you select a hardware RAID solution that meets your specific needs and requirements.
Installing the hardware RAID
When setting up a hardware RAID on a computer system, the first step is to ensure that the necessary hardware components are available. This includes a RAID controller card or a motherboard with built-in RAID functionality, as well as the required number of hard drives or SSDs to be used in the RAID array. It is essential to choose compatible hardware components to ensure proper functionality and compatibility.
Once the hardware components are ready, the next step is to physically install them into the computer system. This typically involves opening the computer case, locating the appropriate motherboard or RAID controller card slot, and inserting the hardware components securely. Proper grounding and anti-static precautions should be taken to avoid any damage to the components during installation.
After the hardware components are installed, the next step is to connect the hard drives or SSDs to the RAID controller or motherboard. This may involve attaching cables to the appropriate connectors on the hardware components and ensuring a secure connection. It is important to follow the manufacturer’s instructions for proper cable connections and configurations.
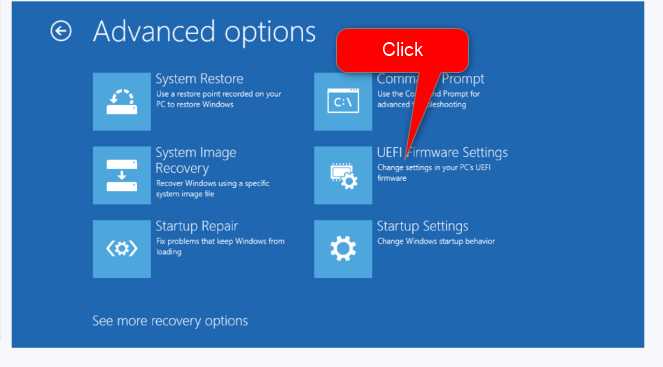
Once the hardware components and drives are connected, the computer system needs to be powered on and the RAID controller BIOS or software needs to be accessed. This can usually be done by pressing a specific key during the system boot-up process to enter the RAID configuration utility. From the RAID configuration utility, the user can create the desired RAID array, specify the RAID level, and configure any additional settings as required.
After the RAID array is created and configured, the computer system can be booted into the operating system. The RAID array should appear as a single logical drive or multiple logical drives, depending on the RAID level chosen. The operating system can then be installed on the RAID array, and any necessary drivers or software can be installed to ensure proper functionality of the RAID.
In conclusion, installing a hardware RAID involves selecting compatible hardware components, physically installing them, connecting the hard drives or SSDs, accessing the RAID configuration utility, creating and configuring the RAID array, and installing the operating system. It is essential to follow the manufacturer’s instructions and best practices to ensure a successful installation and proper functionality of the hardware RAID.
Configuring the hardware RAID settings
When setting up a hardware RAID configuration, it is important to properly configure the RAID settings to ensure optimal performance and data protection. This involves making changes to various parameters and options that control how the RAID controller operates.
One of the first steps in configuring the hardware RAID settings is to access the RAID controller’s management interface. This can usually be done by pressing a designated key during the system boot process, which will bring up the RAID configuration utility. Once inside the utility, you will be able to view and modify the RAID settings.
1. Selecting the RAID level
The RAID level determines how the data is distributed and protected across multiple drives. Common RAID levels include RAID 0, RAID 1, RAID 5, and RAID 10. Each RAID level offers different trade-offs between performance, fault tolerance, and usable capacity. It is important to choose the appropriate RAID level based on the specific needs of the system.
2. Configuring the stripe size
The stripe size determines the amount of data that is written to each disk in the RAID array. A larger stripe size can improve performance for large sequential workloads, while a smaller stripe size may be better for random access patterns. It is recommended to choose a stripe size that aligns with the application’s I/O characteristics.
3. Enabling caching options
The RAID controller may offer caching options that can improve performance. Write cache can be used to temporarily store data before it is written to the disks, while read cache can speed up read operations by storing frequently accessed data in memory. It is important to consider the available memory and usage patterns when enabling caching options, as they can impact both performance and data integrity.
4. Setting up hot spares
Hot spares are additional drives that are kept idle and ready to automatically replace a failed drive in the RAID array. Configuring hot spares can help minimize downtime and ensure data availability in the event of a drive failure. It is recommended to assign at least one hot spare to the RAID array.
Overall, properly configuring the hardware RAID settings can greatly impact the performance, reliability, and fault tolerance of the RAID array. It is important to carefully review the documentation and consider the specific needs of the system before making any changes to the RAID settings.
Testing the hardware RAID
Before deploying a hardware RAID solution, it is crucial to thoroughly test the system to ensure its stability and reliability. Testing the hardware RAID involves validating its functionality, performance, and fault tolerance.
Functionality testing: This phase involves verifying that all RAID controllers, disks, and other components are properly recognized and configured. It includes checking for any compatibility issues and ensuring that the RAID configuration is correctly set up, such as RAID level, stripe size, and cache settings.
Performance testing: Once the hardware RAID is set up, it is important to evaluate its performance under different workloads and stress conditions. This includes measuring the read and write speeds, random and sequential access performance, and IOPS (input/output operations per second). Performance testing helps identify any bottlenecks or issues that may affect the system’s overall performance.
Fault tolerance testing: Hardware RAID offers redundancy and fault tolerance to protect against disk failures. Testing the fault tolerance involves simulating disk failures and verifying that the RAID system can successfully handle and recover from these failures without any data loss or interruption in service. This includes performing hot swaps of failed disks, rebuilding the RAID array, and monitoring the system’s response during these processes.
Overall, testing the hardware RAID is essential to ensure its reliability, performance, and ability to handle failures. It helps identify any potential issues or limitations and allows for fine-tuning the RAID configuration for optimal performance and data protection.