
Ni TestStand is a powerful test management software that helps engineers automate and streamline their test processes. It provides a flexible and customizable framework for managing test sequences, executing tests, and generating reports. Whether you are testing electronic devices, software applications, or mechanical components, Ni TestStand can help you improve the efficiency and accuracy of your testing.
This tutorial is designed to give you a solid foundation in using Ni TestStand. You will learn how to create test sequences, configure test steps, and create custom reports. We will walk you through the process of setting up a test system, defining test configurations, and executing tests. By the end of this tutorial, you will have the skills and knowledge to effectively use Ni TestStand in your own testing projects.
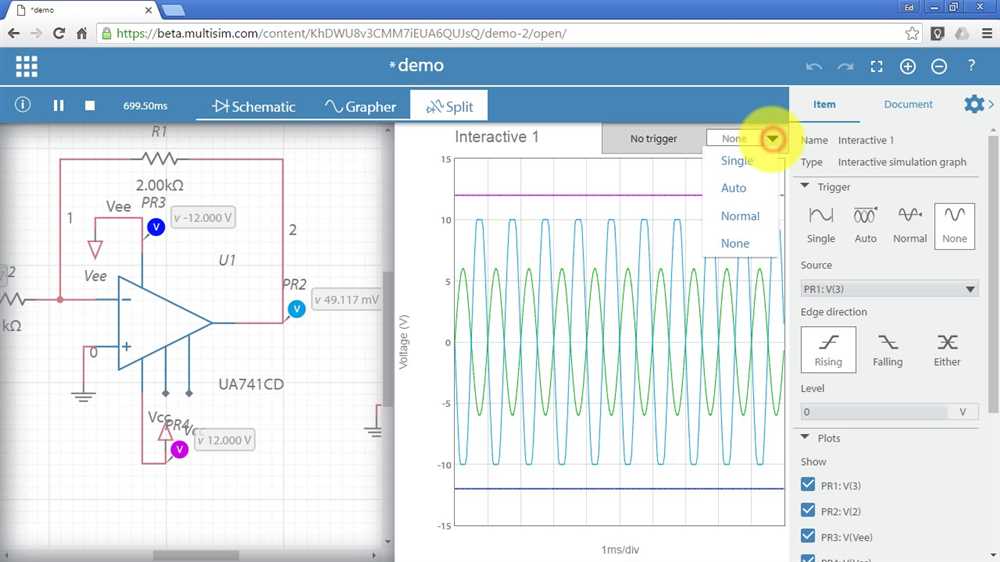
With Ni TestStand, you can easily integrate a wide range of test equipment and instruments to perform automated tests. Whether you need to communicate with an oscilloscope, a power supply, or a database, Ni TestStand provides a seamless interface for controlling and acquiring data from these devices. You can also integrate with other software applications, such as LabVIEW or MATLAB, to perform advanced analysis and processing of test data.
Whether you are a beginner or an experienced test engineer, this tutorial will help you unlock the full potential of Ni TestStand. With its intuitive interface and powerful features, Ni TestStand can revolutionize the way you manage and execute tests. So let’s dive in and start mastering Ni TestStand!
NI TestStand Tutorial: A Beginner’s Guide
In this NI TestStand tutorial, we will provide a comprehensive beginner’s guide to help you get started with TestStand, a powerful test management software from National Instruments. Whether you are new to automated testing or looking to enhance your existing skills, this tutorial will help you understand the basics of TestStand and how to use it effectively in your testing process.
What is NI TestStand?
NI TestStand is a test management software that allows you to create, execute, and manage automated test sequences. It provides a graphical user interface (GUI) that enables you to design and execute test sequences, define test parameters, and generate reports for analysis. TestStand supports a wide range of test environments and can be easily integrated with various test instruments and devices.
Getting Started with TestStand
To get started with TestStand, you will need to install the software on your computer. Once installed, you can launch the TestStand user interface and start creating your first test sequence. Test sequences are built using a modular approach, where you can define individual steps or test modules and organize them into a sequence to be executed.
Defining Test Parameters and Variables
TestStand allows you to define test parameters and variables that can be used throughout your test sequence. These parameters can be used to customize the behavior of your tests or to pass values between different test modules. By properly defining and using test parameters and variables, you can make your test sequences more flexible and reusable.
- Creating and Configuring Test Steps
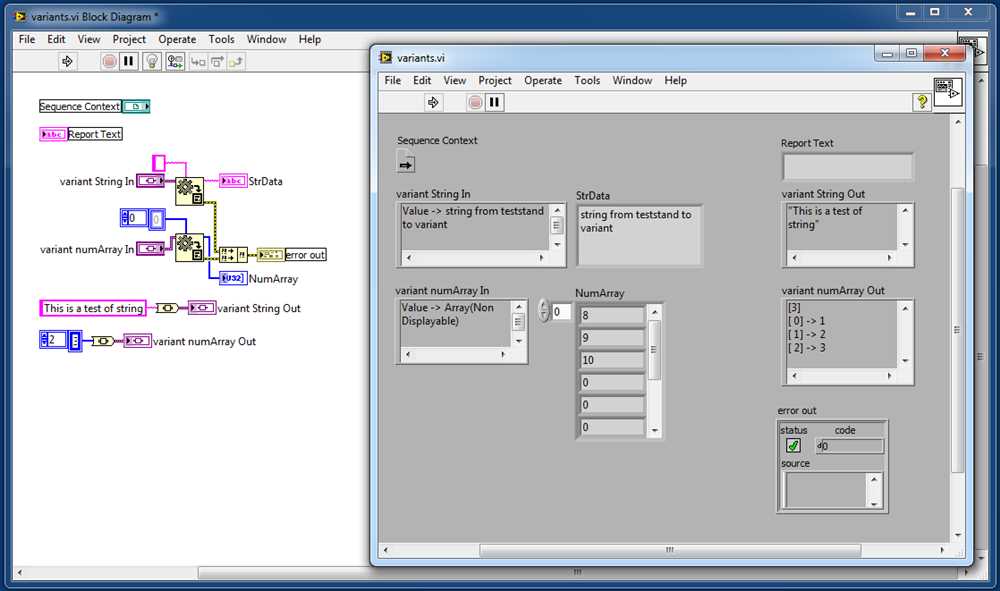
Test steps are the building blocks of a test sequence in TestStand. Each test step can perform a specific action, such as sending a command to a device, reading a sensor value, or performing a mathematical calculation. In TestStand, you can create and configure test steps using a step editor, where you can specify the action to be performed, define input and output parameters, and customize the behavior of the test step.
- Organizing and Executing Test sequences
Once you have created your test steps, you can organize them into a sequence by defining the execution order and any conditional branching or looping. TestStand provides a sequence editor that allows you to visually arrange your test steps and define the sequence flow. You can then execute the test sequence and monitor the execution progress through the TestStand user interface.
Generating Test Reports
One of the key features of TestStand is its built-in report generation capabilities. After executing a test sequence, TestStand can automatically generate detailed test reports with measurement data, test results, and any other relevant information. These reports can be customized to meet your specific requirements and can be exported to various formats, such as PDF or Excel.
With this beginner’s guide to NI TestStand, you should now have a good understanding of the basic concepts and functionalities of TestStand. As you gain more experience and explore advanced features, you will be able to leverage the full power of TestStand to streamline your testing process and enhance the quality of your products.
Understanding Ni TestStand: An Overview
When it comes to automated test systems, Ni TestStand is a powerful tool that provides a framework for test sequencing and reporting. It allows engineers to define and automate their test sequences, making the test development process more efficient and reliable. With its modular architecture, Ni TestStand can be easily integrated with various hardware and software components, making it a versatile solution for different test environments. This overview will provide an introduction to Ni TestStand and its key features.
Test Sequencing and Execution
At the core of Ni TestStand is its ability to define and execute test sequences. A test sequence consists of a series of test steps, which can be any combination of measurements, digital I/O operations, or even software commands. These test steps are organized into test modules, which can be reused across multiple test sequences. Ni TestStand provides a user-friendly graphical interface for creating and editing test sequences, allowing engineers to easily define the flow of their tests.
Once the test sequences are defined, they can be executed either manually or automatically. Ni TestStand provides a runtime environment that controls the execution of the test sequences, ensuring that the steps are executed in the correct order and with the right conditions. During the test execution, Ni TestStand captures and logs the measurement data, allowing engineers to analyze and troubleshoot the test results.
Result Reporting and Analysis
Another key feature of Ni TestStand is its powerful result reporting and analysis capabilities. After the test execution, Ni TestStand can generate comprehensive reports that include test results, measurement data, and any additional information specified by the engineer. These reports can be customized to meet different reporting requirements, such as adding company logos or specific formatting.
Ni TestStand also provides integration with other software tools, such as NI LabVIEW or Microsoft Excel, allowing engineers to further analyze and process the test data. This integration enables engineers to create custom data analysis algorithms or generate interactive charts and graphs for better data visualization.
In conclusion, Ni TestStand is a versatile and powerful tool for automated test systems. Its ability to define and automate test sequences, along with its result reporting and analysis capabilities, makes it a valuable asset for engineers looking to improve their test development process. With Ni TestStand, engineers can streamline their test workflows and ensure the reliability of their test results.
Ni TestStand Installation and Configuration: Step-by-Step Guide
Installing and configuring Ni TestStand can be a complex process, but with this step-by-step guide, you’ll be able to successfully set up and customize your testing environment. Whether you’re a beginner or an experienced user, these instructions will help you navigate through the installation and configuration process seamlessly.
Installation
The first step in setting up Ni TestStand is to download the installation files from the National Instruments website. Make sure you have a compatible operating system and meet the system requirements specified by Ni TestStand. Once you have the installation files, run the installer and follow the on-screen instructions to complete the installation process. It’s recommended to install all the components and features to ensure full functionality of Ni TestStand.
After the installation is complete, you’ll need to activate your license. This can be done through the NI License Manager, where you can either activate a trial license or enter your product key. Follow the prompts to activate your license and make sure it is successfully activated before proceeding with the configuration.
Configuration
Once Ni TestStand is installed and licensed, it’s time to configure the software for your specific testing needs. Start by launching TestStand Configuration Utility, which will allow you to customize various settings and options.
One of the key aspects of configuration is defining your test sequences and steps. TestStand uses a modular approach, where you can create reusable sequences and steps that can be easily combined to create different test sequences. Use the Sequence Editor to create and customize your test sequences, adding steps, parameters, and variables as needed.
Additionally, you’ll need to configure your test system and devices. This includes configuring drivers, interfaces, and device-specific settings. Use the Hardware Configuration utility to add and configure your devices, ensuring they are properly recognized and can communicate with TestStand.
Finally, make sure to configure report generation and result logging. TestStand provides options to generate test reports in different formats, such as HTML or PDF, and allows you to customize the content and layout of the reports. You can also configure result logging to keep track of test results for further analysis and troubleshooting.
By following these installation and configuration steps, you’ll be able to set up Ni TestStand and customize it to suit your testing requirements. Make sure to consult the official documentation and seek assistance from the Ni TestStand community if you encounter any issues or have specific questions about your setup.
Creating Your First Test Sequence in NI TestStand
NI TestStand is a powerful test management software that allows you to create automated test sequences for your electronic devices. This tutorial will guide you through the process of creating your first test sequence using NI TestStand.
Step 1: Create a New Test Sequence
To create a new test sequence, open NI TestStand and click on the “New Test Sequence” button. Give your test sequence a relevant name and specify the location where you want to save it. Once you have entered the necessary information, click on “Create” to create the test sequence.
Step 2: Add Steps to Your Test Sequence
Once you have created your test sequence, you can start adding steps to it. Each step represents a test or an action that needs to be performed. To add a step, right-click on the test sequence and select “Insert»Step” from the context menu. A list of available steps will appear, and you can select the desired step from the list.
Step 3: Configure the Steps
After adding a step to your test sequence, you need to configure it to specify what it should do. This can include setting input parameters, defining expected output values, or specifying other relevant information. To configure a step, double-click on it and a properties dialog will appear. Here, you can modify the necessary settings and parameters to match your test requirements.
Step 4: Organize Your Test Sequence
As you add more steps to your test sequence, it’s important to organize them in a logical order. You can use containers, such as sequences or loops, to group related steps together. To add a container, right-click on the test sequence and select “Insert»Sequence” or “Insert»Loop” from the context menu. Then, drag and drop the desired steps into the container.
Step 5: Run Your Test Sequence
Once you have finished creating and organizing your test sequence, you can run it to execute the tests. Click on the “Run” button in NI TestStand to start the execution. You can monitor the progress and view the test results in real-time.
By following these steps, you can easily create your first test sequence in NI TestStand and begin automating your test processes. Remember to save your test sequence frequently to avoid losing any changes.
Configuring Ni TestStand User Interfaces: Customization Options
Ni TestStand is a powerful software test management tool that provides a flexible and customizable user interface. With Ni TestStand, users have the ability to configure the appearance and functionality of their test environments to suit their specific needs and requirements. This includes customizing the layout, colors, and overall look and feel of the user interface.
One option for customizing the Ni TestStand user interface is through the use of themes. Themes allow users to select predefined color schemes and styles or create their own custom themes. By selecting a theme, users can quickly change the overall look of the user interface, making it more visually appealing and easier to navigate.
Another customization option is the ability to create and modify user-specific settings. Users can change default settings, such as the font size and layout of windows, to better meet their individual preferences. Additionally, users can create custom toolbars and menus, adding shortcuts to commonly used features and increasing productivity.
The Ni TestStand user interface also allows for advanced customization through the use of scripting and programming. Users with programming knowledge can create custom buttons, dialogs, and other interface elements using languages such as LabVIEW or C#. This level of customization opens up endless possibilities for tailoring the user interface to specific testing requirements and workflows.
In conclusion, Ni TestStand offers a wide range of customization options for its user interfaces. From themes and settings customization to advanced scripting and programming, users can configure the appearance and functionality of their test environments to best suit their needs. This level of customization helps to improve productivity and usability, ultimately leading to more efficient and effective testing processes.