
If you are looking for a helpful resource to practice interpreting and creating dot plots, then this dot plot worksheet with answers is exactly what you need. Dot plots are a simple yet effective way of displaying data in a visual format. They are especially useful when dealing with small to medium-sized datasets, as they allow us to quickly identify key features and analyze the distribution of the data.
This dot plot worksheet provides a series of exercises that will test your understanding of how to read and interpret dot plots. Each exercise presents a dot plot with a corresponding question that you need to answer. The questions vary in difficulty and cover topics such as finding the median, identifying outliers, and comparing datasets. The answers to each question are provided in a separate PDF so that you can check your work and make corrections as necessary.
In addition to practicing interpretation, this worksheet also includes exercises that require you to create dot plots from given data. This will help you develop the skills needed to organize and present data in a clear and concise manner. Creating dot plots is an important skill in data analysis, as it allows us to visualize patterns and trends that may not be immediately apparent from looking at a table of numbers.
Whether you are a student learning about dot plots for the first time or a professional looking to refresh your knowledge, this dot plot worksheet with answers is an excellent resource. It provides an opportunity to practice and reinforce your understanding of dot plots, ensuring that you have the skills and confidence needed to analyze and interpret data effectively.
What is a Dot Plot? A Visual Representation of Data
A dot plot is a simple but effective way to visually represent data. It provides a clear and concise summary of the distribution of data. In a dot plot, each data point is represented by a dot. The dots are placed along a number line or a grid, corresponding to the values of the data. The dots help to show the frequency or density of the data points at each value.
One of the advantages of a dot plot is its simplicity. It is easy to understand and interpret, making it useful for both data analysis and data presentation. With a glance, you can see the spread of the data and identify any outliers or patterns. It is particularly useful when dealing with small datasets or when you want to compare multiple datasets or groups. In addition, dot plots can be customized by using different symbols or colors to represent different categories or variables.
To create a dot plot, first, organize your data in ascending or descending order. Then, draw a number line or a grid with equal intervals that span the range of the data. Each dot represents a data value, and it is placed above the corresponding value on the number line or grid. If there are multiple data points with the same value, they can be stacked or spread out horizontally. Finally, label the axis and title the plot for clarity.
In conclusion, a dot plot is a visual representation of data that uses dots to show the frequency or density of data points at each value. It is a simple and effective tool for summarizing and analyzing data. By creating a clear visual display, dot plots enable quick and easy interpretation of data, making them useful in various fields such as statistics, finance, and research.
Understanding the Basics: What is a Dot Plot and How Does it Work?
A dot plot is a simple and effective way to visualize data and see the distribution of values in a dataset. It is a type of graph where each data point is represented by a dot along a number line. The dots are stacked vertically above their respective values, creating a visual representation of the frequency or density of each value.
To create a dot plot, you first need to determine the range of values in your dataset. Then, you draw a number line that spans this range. Next, for each value in the dataset, you place a dot above the corresponding location on the number line. If there are multiple occurrences of the same value, you stack the dots vertically to indicate the frequency.
For example:
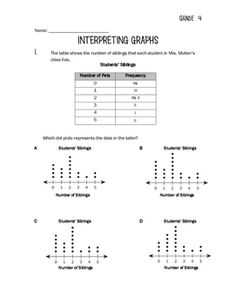
- If you have a dataset of test scores ranging from 60 to 100, you would draw a number line from 60 to 100.
- For each test score, you would place a dot above the corresponding location on the number line.
- If there are multiple students who scored the same test score, you would stack the dots vertically to indicate the frequency.
A dot plot provides a quick and visual summary of the distribution of values in a dataset. It allows you to easily identify the most common values, outliers, and any patterns or trends that may exist. It is particularly useful for smaller datasets or datasets with discrete values.
Tip: You can also enhance a dot plot by adding additional information, such as mean, median, or quartiles, to provide more insights into the data.
Creating a Dot Plot Worksheet: Step-by-Step Guide
In order to create a dot plot worksheet, it is important to follow a step-by-step guide to ensure accuracy and clarity in the exercise. The dot plot, also known as a dot chart or strip chart, is a visual representation of data that uses dots to represent individual data points. This type of graph is useful for displaying and analyzing small to moderate-sized data sets.
Step 1: Determine the Data Set
Begin by selecting a data set that is appropriate for the level of the students. This could be a set of numbers, survey responses, or any other quantitative data that can be represented on a dot plot. It is important to choose a data set that is not too large or complex for the students to work with.
Step 2: Organize the Data
Organize the data set in ascending order from the smallest value to the largest value. This will make it easier to determine the range and create the dot plot. If there are any repeating data points, count the number of times each value appears and record this information.
Step 3: Determine the Scale
Decide on an appropriate scale for the dot plot. This will depend on the range of the data set and the desired level of detail. It is important to choose a scale that allows for easy interpretation of the data and clear visibility of the dots.
Step 4: Create the Dot Plot
Using the organized data set and the chosen scale, create the dot plot. Start by drawing a horizontal axis and labeling it with the appropriate scale. Then, for each data point, place a dot above the corresponding value on the axis. If there are multiple data points with the same value, stack the dots vertically.
Step 5: Add Details
Complete the dot plot by adding any necessary details, such as a title, labels for the horizontal axis, and a key if there are multiple data sets being represented. Check for accuracy and clarity, making any adjustments as needed.
This step-by-step guide provides a clear framework for creating a dot plot worksheet. By following these steps, educators can ensure that students have a solid understanding of dot plots and are able to effectively interpret and analyze data using this graphical representation.
Common Questions: Dot Plot Worksheet Answers

When working on a dot plot worksheet, it is common to have questions about the answers and how to interpret the data. Here are some frequently asked questions and their answers:
Q: What is a dot plot?
A: A dot plot is a graphical representation of data where each data point is represented by a dot above its corresponding value on a number line. It allows for easy visualization of the distribution of data.
Q: How do I read a dot plot?
A: To read a dot plot, you need to look at the number line and identify the frequency at each data point. The height of the dots represents the frequency or count of that particular value.
Q: How do I find the median from a dot plot?
A: To find the median from a dot plot, locate the value that has an equal number of dots on both sides. If there is an odd number of data points, the median is the value with the most dots. If there is an even number of data points, the median is the average of the two middle values.
Q: How can I determine the range from a dot plot?
A: To determine the range from a dot plot, look for the highest and lowest values on the number line. The range is the difference between these two values.
Q: How do I interpret the shape of a dot plot?
A: The shape of a dot plot can provide insights into the distribution of the data. If the dots are evenly spread out and form a symmetrical pattern, the data is likely to be normally distributed. If the dots are clustered in certain areas, it indicates a skewed distribution.
Summary
- A dot plot is a graphical representation of data where each data point is represented by a dot above its corresponding value on a number line.
- To read a dot plot, look at the number line and identify the frequency at each data point.
- The median can be found by locating the value with an equal number of dots on both sides.
- The range is determined by looking at the highest and lowest values on the number line.
- The shape of a dot plot can provide insights into the distribution of the data.
Advanced Tips: How to Analyze and Interpret a Dot Plot
In data analysis, a dot plot is a visual representation of data that helps to identify patterns, outliers, and trends. It is a simple yet effective tool for understanding and interpreting data. Here are some advanced tips to enhance your analysis and interpretation of dot plots:
1. Familiarize yourself with the data:
Before diving into the analysis, take the time to understand the nature of the data. Look for any trends or patterns that might be present. Consider the range, distribution, and shape of the data points. This will provide you with a solid foundation for interpreting the dot plot.
2. Identify the center and spread:
The dot plot provides valuable information about the center and spread of the data. Determine the median by locating the middle dot on the plot. This represents the center of the data. To assess the spread, observe how densely the dots are clustered. A tighter cluster indicates a smaller spread, while a more spread-out distribution suggests a larger spread.
3. Analyze outliers:
Outliers are data points that deviate significantly from the main cluster. They can impact the overall interpretation of the data. Identify and analyze any outliers on the dot plot. Consider their potential causes and effects. Determine if they are due to measurement errors or if they represent true anomalies in the data.
4. Compare multiple dot plots:
If you have multiple datasets, create and compare multiple dot plots. This enables you to identify differences and similarities between the datasets. Look for variations in the center, spread, and distribution of the dots. Such comparisons can provide insights into relationships and patterns that may not be apparent when analyzing individual dot plots.
5. Consider the context:
Always interpret the dot plot within the context of the data and the specific question or hypothesis you are investigating. Consider the variables involved, their units of measurement, and any known limitations or biases. This holistic approach will ensure that your analysis and interpretation are accurate and meaningful.
By applying these advanced tips, you can extract deeper insights from your dot plots and make more informed decisions based on the data. Remember to approach your analysis with an open mind and constantly question the meaning behind the dots.
Benefits of Using a Dot Plot Worksheet in Data Analysis
In data analysis, dot plots are a powerful tool for visualizing and summarizing numerical data. They provide a clear and concise representation of the distribution of a data set, making it easier to identify patterns, outliers, and trends.
Using a dot plot worksheet can offer several benefits for data analysis:
- Easy comprehension: Dot plots are simple and intuitive, making them accessible to both data analysts and those who are new to data analysis. The use of dots instead of bars or other visual elements helps to maintain the focus on individual data points, making it easier to grasp the information presented.
- Identification of outliers: Dot plots make it easy to identify outliers in a data set. Outliers, which are data points that deviate significantly from the bulk of the data, can greatly influence the overall analysis and understanding of the dataset. By visualizing the data through a dot plot worksheet, analysts can quickly spot these outliers and investigate them further.
- Comparison of multiple datasets: Dot plots allow for the comparison of multiple datasets side by side. This comparative analysis can help identify similarities and differences between datasets, and make it easier to draw conclusions or make decisions based on this information.
- Clear representation of data distribution: Dot plots provide a clear representation of the distribution of data. By visually mapping the data points on a number line, dot plots make it easier to understand the spread, skewness, and central tendency of the dataset. This information is crucial for making accurate interpretations and predictions.
- Evidence-based decision making: Dot plots facilitate evidence-based decision making by providing a visual and quantitative representation of data. With the help of a dot plot worksheet, analysts can present their findings in a clear and transparent manner, making it easier for decision makers to understand and act upon the information presented.
In conclusion, dot plot worksheets are a valuable tool for data analysis due to their simplicity, ability to identify outliers, facilitate comparative analysis, provide a clear representation of data distribution, and support evidence-based decision making. By using dot plot worksheets, analysts can enhance their understanding of the data and effectively communicate their findings to others.
Q&A:
What is a dot plot worksheet?
A dot plot worksheet is a visual representation of data that uses dots to represent data points on a number line.
How can a dot plot worksheet help in data analysis?
A dot plot worksheet can help in data analysis by allowing for the easy identification of patterns, trends, and outliers in a dataset.
What are the benefits of using a dot plot worksheet in data analysis?
The benefits of using a dot plot worksheet in data analysis include its simplicity and ease of interpretation, the ability to clearly see the distribution of data, and the ability to compare multiple datasets at once.
How can a dot plot worksheet be created?
A dot plot worksheet can be created by first organizing the data in ascending order, then drawing a number line and placing a dot above each data point to represent its frequency or value.
Can a dot plot worksheet be used for both qualitative and quantitative data analysis?
Yes, a dot plot worksheet can be used for both qualitative and quantitative data analysis. For qualitative data, the dots can represent categories, while for quantitative data, the dots can represent values.
What is a dot plot worksheet?
A dot plot worksheet is a tool used in data analysis to display and interpret data. It consists of a line or axis where each data point is represented by a dot.